
By: Author John Cunningham. Published: 2022/08/31 at 4:47 pm
Moving snow is tough enough without the added challenges of swinging wrenches in the snow. Snow blowers are reliable, but like all kit they have a few weak areas, and it sounds like you’ve found one of them.
I’m a small engine mechanic, and your blower sounds like it’s got a fueling issue. This isn’t a big problem, and we’ll have you fixed up and moving snow in no time.
Snow blowers commonly stall after running because the fuel is contaminated. However, there are some other possibilities, too; they include:
- Faulty tank gas cap
- Sticking choke
- Faulty spark plug
- Faulty coil
- Faulty carburetor
In this post, you’ll learn how to diagnose which of the common faults relate to your snow blower and, of course, how to fix them. These tests are all easy, and the repairs won’t require any special tools, but I’ll let you know what tools you will need to make each repair.
Let’s get stuck in!
Index
Faulty Gas Tank Cap
A gas cap is just a cap to stop the gas from splashing out, right? That is an important function of a gas cap but not the only one. A gas cap incorporates a one-way valve; it prevents vapors from leaving the tank but crucially allows air in as the gas level drops inside the tank.


If the valve weren’t there, the tank would vapor lock, and the engine would stall. This commonly happens when gas caps are misplaced, and a makeshift cap fitted instead.
How to diagnose
The diagnosis is simple: loosen the cap next time the engine stalls and attempt to restart; if she now runs, you need a new gas cap, easy fix.
Contaminated Fuel
As contaminated gas affects all small engines, it is the most prolific cause of small engine problems, snow blowers included. This problem usually arises early in the season when the blower is first pulled out.
The problem is stale gas. Today’s gas is blended with ethanol, and the blended gas doesn’t do well sitting in small engines for periods longer than a month.


The nature of small engine fuel systems means the gas tank is vented into the atmosphere, which promotes fuel deterioration.
So why does the engine start, run fine, and then stop?
Most likely because the fuel already in the fuel line isn’t as degraded as the gas tank fuel, but as the fuel line gas is used up, the stale gas reaches the engine, and it stalls.


Another possible reason is carburetor bowl contamination. This is where the gas left in the bowl over the summer months partially congeals and floats around in the bowl until eventually being sucked into the small bowl jet and stalling the engine.
Either way, we’ll soon find out, and we’ll cover that next in diagnosis.
Tools – We’ll likely need a few wrenches, or a small ratchet and socket set will do, also. We may also need Philips or Torx drivers to remove some plastic covers. An old shop rag and some disposable gloves are best as gas. We’ll be handling gas.
You’ll find most of these tools here on the Snow blower tools page
Diagnosis – To diagnose, we’ll need to remove the carburetor bowl. The bowl acts as a reservoir of gas, which also serves to trap dirt, and that’s why it’s our first port of call.
The removal process looks like this:
- Turn the gas valve off
- Remove the plastic covers to access the carburetor
- Place shop cloth under the bowl and wear plastic gloves before opening the bowl fastener
- Remove the bowl and check the bowl contents and also the bowl fastener
Two possibilities are likely:
- The fuel looks murky, and the gas looks yellow in color – If that sounds like a fair description of your gas, then go ahead and drain it out. We’ll cover gas draining that below.
- The gas looks OK (or murky), but the bowl fastener has a small hole that is completely blocked. If this sounds like your condition, then cleaning the bowl and, more partially, the bowl fastener will solve the problem. The Bowl fastener cleaning fix is covered below.
The fix for contaminated gas
You got lucky with this one; draining old gas is easy.


I like to use a siphon to suck the gas from the gas tank directly instead of draining the stale gas through the fuel lines. But draining out through the lines works fine too, but we will need to rinse the tank with some fresh gas before refitting the gas line.
Anyhow, here are the steps to successful gas draining:
- Gas valve turned off or pinch the gas line with small vice grips
- Remove the gas line from the carburetor
- Place the gas line in a small container (an old plastic water bottle works great)
- Turn the gas tap on and drain the tank (you may need several bottles if the tank full)
- Add some fresh gas to aid in rinsing the tank
- Refit the gas line
- With the carburetor bowl removed, allow some gas to flow through the carburetor. (note: if you don’t have gas flow at this point, you likely have a fuel valve issue, and I’ve covered that issue previously here “Carburetor cleaning”
- Clean and refit the gas bowl; be careful to seat the bowl correctly on its rubber seal; failing to do so will cause the bowl to leak gas.
- Tighten the bowl fastener, and bear in mind if your bowl fastener has a small drilled hole in it, it’s a dual-purpose component. It’s a bowl fastener and main jet; this must be clean, and I’ve covered cleaning it below. Avoid over-tightening the bowl fastener, as this will pinch the bowl seal and cause the bowl to leak.
I’ve covered fuel draining previously, and you can check that out here “Carburetor cleaning”
Old gas makes a great agent for cleaning oil-based paints and paint brushes, but you’ll obviously need to seal the bottles and store them safely.
The fix for dirty fuel jet/fastener

Many small carburetor manufacturers employ a dual-purpose carburetor fastener. It acts as a fastener but also a fuel metering jet. The size of the machine-drilled jet hole is precisely measured to the size of your engine.
And a clean, free-flowing jet is critical to proper engine performance. A partially blocked jet commonly allows the engine to idle or operate under load for a short while but then causes the engine to die as the load is applied.
To fix this, we need to clean the jet thoroughly, and the challenge is its size. We’ll need a probe small enough. I find plucking a strand of wire from a wire brush with pliers works great. You may also strip some electrical wire and use a copper strand as a probe.


I’d avoid using tools such as a micro drill bit as the fasteners are usually made from brass, and the micro bit could easily enlarge the precise drilling, which will cause rich running performance issues.
Anyhow, here’s the process I use:
- Pluck wire brush strand
- Probe the jets single top drilling
- Use carb cleaner to blow contaminates through the side drillings
- Refit the bowl as per the above guide
I’ve covered jet cleaning in previously, and you can check that out here “Carburetor cleaning”
We need to be thorough here, and also, the fastener base gasket needs to be intact; otherwise, the bowl will leak.
Job done!
Sticking Choke


A choke, as you know, is needed to start your snow blower from cold, but as it warms up, the choke needs to be reduced proportionally until it’s off completely when the engine is warm.
Leaving the choke in the full-on position when the engine is hot will choke the engine and flood it with gas. We don’t use choke in our cars anymore; it’s no surprise then that we may be a little foggy on its operation.
Modern vehicles use automated choke, as is the case for some snow blowers, but if you have a choke fitted and if you are in any doubt as to its operation, check out this post, “When should you use choke?”
You may say, No! I know how to start my snow blower; I’ve been doing it for years. I say great! If that’s the case, we may have a choke fault then, and we’ll check that right now.
Tools – For the following diagnosis and repairs, we’ll need Philips and likely Torx drivers and some WD40. You’ll find most of these tools here on the Snow blower tools page
Diagnosis – The choke test is as follows:


- Remove the carburetor plastic shields (snow blowers don’t use air filters)
- Set the choke to fully off
- Check the choke plate is fully off (open)
If not, you’ve found your problem, and we’ll need to adjust it, and we’ll cover that next.
The fix – Most choke systems are operated by a handlebar-mounted choke control lever. When mounted there, they will employ a cable to activate the choke plate at the carburetor. The cable stretches over time and requires a little tweak.
The process is as follows. Note what I describe is a typical setup, but yours may differ slightly:
- Set the choke to fully off position
- Follow the choke cable to where its mounting bracket at the engine
- Loosen, but don’t remove the bracket
- Now manually (use your fingers) open the choke plate fully and or push the choke cable towards the carburetor a little
- Tighten the choke mounting bracket
- Test your choke
The choke should now move freely from fully on (closed) to fully off (open) when activated. Add a little WD40 to cable operation.
I’ve covered choke adjusting in a video previously; see 17.18 min on this video, “Kohler carburetor cleaning.”
Faulty Spark Plug
A spark plug must have the toughest job there is. Consider the life of a plug. It lives right in the thick of it. It’s buried in the center of the hot engine with its electrode located inside the combustion chamber under constant attack from heat, fire, pressure, and chemicals, and don’t forget thousands of volts of electricity.


Plugs give a ton of trouble, and it’s easy to see why. In this section, we’ll check the plug is doing its job.
Tools – Plug wrench, ignition system tester, wire brush, and plug gap tool. You’ll find most of these tools here on the “Snow blower tools page”
Diagnosis – We’ll need to remove the spark plug first to check its condition and assess its performance. When diagnosing a plug, we’ll first pay attention to how it’s fitted – a loose-fitting plug wire or, indeed, a loose plug itself will cause issues.
Assuming all is good, we’ll move on and run the following checks:
- Check the insulator for cracks or obvious signs of damage (white ceramic material) – A damaged insulator will cause the plug to fail as it heats up.
- Check the electrode color (see below for what each color means) – The color of the plug offers a clue as to what the root cause is
- Check electrode is clean, and the plug gap is correct – Spark plugs employ an electrode with a preset gap. The gap is important; that’s where the spark is born, and if the gap isn’t at the optimum width, a range of symptoms is common. See cleaning and gapping the plug below.
- Check the correct plug type is fitted – Spark plugs are designed to operate at an optimum temperature and are graded as such. Every engine will require a particular grade plug. As spark plugs use a common thread size, fitting the wrong plug type is so common. Doing so can cause a wide range of symptoms, including an engine that starts and then stalls.
- Check the spark – In this test, to check the spark, we’ll run a no-tools MacGyver-type spark test. It’s great for checking the plug but not so good for checking the whole ignition system. To test the ignition system thoroughly, we’ll need to use an Inline tester, and we’ll cover that a little later in Coil testing below.
Plug Color


| Plug Electrode Color | Likely Cause |
| Tan | Normal |
| Black and Sooty | Running rich – possible ignition system or carb issue |
| White | Running lean – possible carb fuel type or valve issue |
| Black and Oily | Possible head gasket or engine wear issue |
| Wet | Flooded engine – possible carb, ignition, or stale fuel issue |
Checking Spark
The ideal time to run this test is when the condition is present; I’d run the engine until it stalls and then run this test. As you know, there are two ways to test spark: the no-tools MacGyver test and the more thorough Inline spark test. We’ll cover the MacGyver-type test here and the Inline test below in faulty coil testing.
The no-tools MacGyver spark test is as follows:
- Remove the plug wire
- Remove the spark plug
- Refit the plug wire
- Ground the spark plug threads against the engine (grounding means the plug metal body must make good contact with the metal of the engine. I sometimes use a jumper set to make sure there’s good contact)
- Crank over the engine and check the spark


Check out the spark checking video here.
In this situation, two outcomes are likely:
- The plug offers no spark
- The plug offers a weak spark
In both cases, go ahead and try cleaning and gapping the plug or replace it and test it again. If it fails to offer you a spark, go ahead and check the coil as per below.
Cleaning & Gapping Spark Plug
Cleaning and gapping a spark plug is as simple as it sounds.
The process is as follows:
- Remove the plug
- Using a wire brush, clean the electrode
- Using the appropriate feeler gauge, check the gap
- To adjust the gap, widen it using a flat screwdriver or close the gap by tapping the electrode with the handle of a screwdriver.
Check out the plug cleaning video here and the plug gapping procedure video here.
Job done!
The fix – Go ahead, clean and gap the spark plug, or replace it altogether, but check you’re replacing it with the correct plug type.
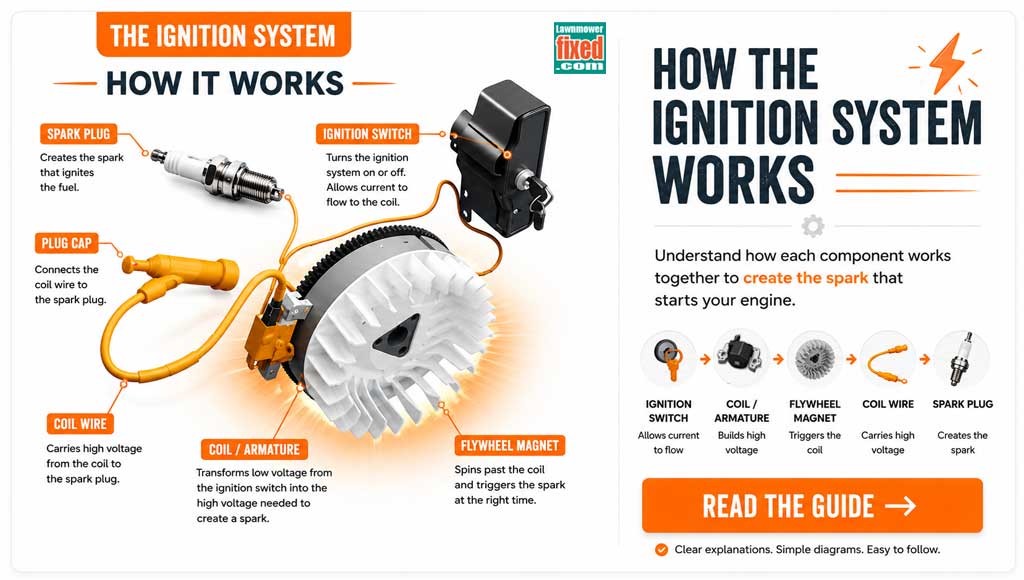
Faulty Coil


A coil, also known as an armature, is where the energy to make a spark is made. It’s located close to the rotating flywheel for good reason; a magnet on the flywheel excites the coil on every revaluation of the engine.
The small charge generated travels through the windings of the coil and is magnified into thousands of volts by the time it reaches the spark plug electrode.
As you can imagine, after the spark plug, the coil is likely the next hardest working component on your snow blower engine and, therefore, one of the top candidates on our list of possible failures.
Tools – You’ll find most of these tools here on the “Snow blower tools page”


Diagnosis – To diagnose a faulty coil, we run the same test as per spark plug testing. Run the engine as normal from the cold with the inline spark tester. When the engine begins to falter, check the inline spark tester window. A missing spark indicates coil failure, go ahead and replace the coil.
I’ve covered it previously with pictures here “Snowblower won’t start no spark”
Check out the spark checking video here.
The fix – Go ahead and replace the coil. It’s not a difficult job, but we’ll need to nail the gap setting correctly. Steps as follows:
- Remove blower housing
- Remove plug wire
- Remove coil fasteners (2)
- Remove coil ground wire
- Remove the coil
The coil fitting process is just the reverse, but you’ll need to adjust the coil to the flywheel air gap. The process is as follows:


- Fit coil grounding wire
- Fit coil fasteners, and snug them down but don’t tighten them yet
- Check the coil air gap
- Slip appropriate feeler gauge between coil and flywheel
- Tighten coil fasteners
- Rebuild as per removal
I’ve covered this process with pictures previously, and you can check it out here –“Snowblower won’t start no spark.”
Check out the spark checking video here.
Job done!
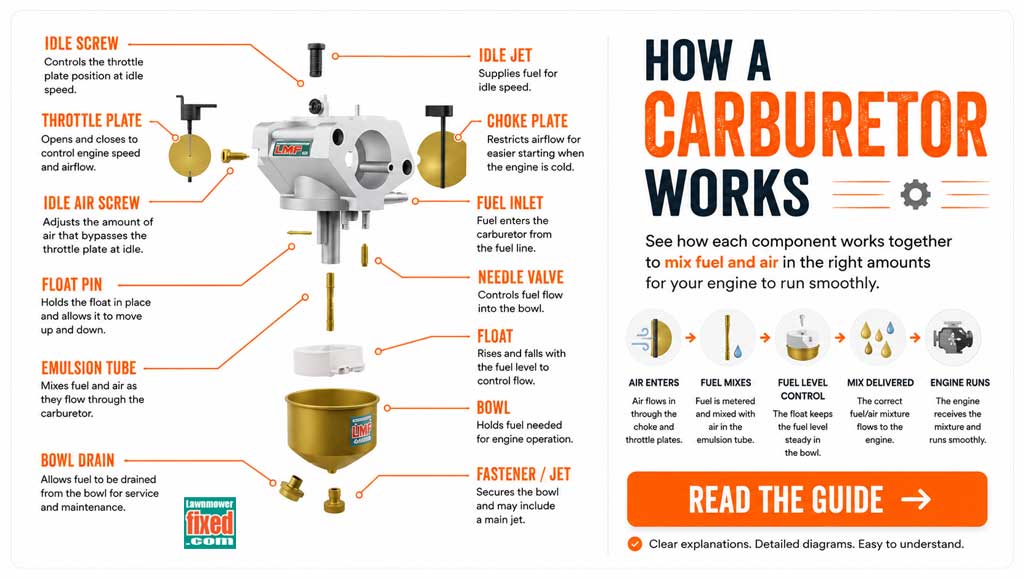
Faulty Carburetor
A faulty carburetor is possible but is the least likely, so it is at the bottom of our list.


A carburetor is a simple component and yet a very complicated one all at once. It’s the business end of your fueling system, and if your carburetor has even the slightest issue, it will protest loudly.
Common carburetor symptoms include:
- The engine starts and then stops
- The engine won’t start
- Engine surging
- Engine lacks power
- Engine backfiring
- The engine won’t crank over
- Leaking gas
Your snow blowers carburetor is tasked with a few critical jobs; they include:
- Supply gas to the engine
- Supply the correct amount of gas
- Mix gas and air together
- Mix gas and air together to a very precise ratio


Diagnosis – Diagnosis is not easy; that’s partly why it’s at the bottom of our list. A corrosion-damaged carburetor is easy to spot; removing the gas bowl will reveal that, but a worn-out carb isn’t so easy to spot.
I like to eliminate all the other common causes before homing in on the carb. If the carb is old, then replacing it won’t hurt as it is a simple job, and a new carb doesn’t usually cost more than $50.
Check out common new carb prices here (internal link)
Tight Valves
Tight vales tend to cause issues as they expand with a hot engine; this is a possible but not a very common cause.


That said, if you’ve gotten to the bottom of the list, it may be worth checking. I’ve covered this previously, and you can check it out here, “Checking & adjusting valves,“ or check out the valve adjusting video here.
Sum Up
In the majority of cases, a snow blower that starts and then stalls suffers from contaminated fuel; draining the fuel and or the carburetor gas bowl is the most likely fix.
That said, ignition system issues will offer identical symptoms, and so often in the workshop, I’ll try swapping a spark plug out first, just to see if it helps. (Kind of like how an optician fault finds – Better or Worse)
I recommend having a new plug spark plug on hand for fast fault finding.
You may also find the following posts helpful:
You may find the following posts helpful:

- About the Author
- Latest Posts


John Cunningham is a Red Seal Certified Tech with 25+ years of wrenching.
Bringing hands-on expertise to LawnmowerFixed.com, John writes practical repair and lawn care guides with a passion for keeping outdoor equipment running smoothly.