
By: Author John Cunningham. Published: 2021/06/15 at 5:18 pm
A snowblower that only runs on choke is irritating, and besides, it’s potentially bad news for the engine. You are correct in dealing with this issue right now. It’s not a problem that will fix itself and will eventually result in a no-start, at best.
A snowblower that runs better on half choke likely suffers from a dirty or faulty carburetor. Cleaning or replacing the carburetor will fix the issue.
In this post, you’ll learn how to diagnose the root cause of the problem successfully. You’ll learn how to clean the carburetor, tools, and products needed. You’ll also learn when and how to replace the carburetor, including ordering the correct carburetor.
Diagnosing Snowblower Runs Better On Choke
Snowblowers like lawnmowers and most other small-engine garden equipment are only employed for a few months of the year. Problems often arise at the beginning of the new season, especially when the kit hasn’t been serviced or stored correctly.
I don’t blame equipment owners; we all live busy lives, and servicing or storage preparation often isn’t high on the list. Although when we need equipment, we need it now, and it needs to be reliable. A little later in this post, I’ll share a mechanic’s top tip for a trouble-free start to the new snow season.
So what’s the problem? Why does the snowblower run better with choke? The problem likely began at the end of last season. Gas goes stale; when it does, it often congeals inside the carburetor.


The old gas turns into a gummy mess that easily clogs the emulsion tube and the main jet’s fine fuel feed ports.
Less fuel equals less power; however, as you found out, applying a choke makes the engine run smoothly.
So what’s up with that?
The reason for this is simple, and you’ve likely guessed it already, applying a choke adds gas.
Applying the choke replaces the missing fuel caused by the partially blocked carburetor.
A carburetor is a finely balanced component, and although the engine may seem to run well on the choke, it isn’t designed to. An engine that runs rich (getting too much gas) can cause more severe problems, like engine oil contamination, resulting in crankshaft bearing damage.
An engine that runs lean (not enough gas) causes the engine to run excessively hot; valve damage may result, or worse, engine seizure.
Diagnosing is Easy
Your description of the problem is pretty conclusive – Gas starvation (not enough gas).
In order to confirm our suspicion, we’ll need to remove the gas bowl and check for sludge. But just before we do that, we’ll need to shut off the gas to the carburetor.
Removing the gas bowl before shutting off the gas will cause the gas to leak from the gas tank. Most snowblowers are fitted with a fuel valve. Its function is to control gas flow, turning the tap clockwise to shut off the gas.
Not all snowblower engines are fitted with a tap, but if yours is, it will be fitted between the gas tank and carburetor.


If you don’t have a tap fitted, go ahead and use a fuel line clamp or needle nose vice grips to gently pinch the fuel line.
Removing the gas bowl before shutting off the gas will cause the gas to leak from the gas tank.
Now we are set to remove the gas bowl. Go ahead and locate the carburetor gas bowl; it’s fitted behind the air filter housing.
It’s usually fixed in place with one fastener at its base. Have a rag handy and wear gloves; the contents of the bowl will leak when the fastener is loosened.


Check the bowl for sludge and grit; finding contamination here means you have confirmed your suspicion. The best fix is to remove and clean the carburetor. And that’s exactly what we’ll do in the next section.
How To Clean Snowblower Carburetor


In some cases, draining the bowl and/or removing the bowl, cleaning, refitting, and turning the gas back on fixes the problem.
It’s worth a try.
However, for most, carburetor removal and cleaning is the only fix.
Tools you’ll need
Most snowblower engines are easy to work on, and you’ll likely already have all the tools you need to nail this repair. You will, however, require carb cleaner. This stuff is chemically engineered to remove gumming, so carb cleaner is mission-critical to nailing this job.
You can check out the carb cleaner I use here on the “Snowblower maintenance tools page.”
In addition, you’ll need the following tools:
- Grips or fuel line clamp
- Pointy nose pliers
- Screwdrivers flat and Philips
- Small socket set
- Wrench set
- Carb cleaner brush
Removing Snowblower Carburetor
Removing, stripping, and cleaning the carburetor is all covered here in this post, but if you need video help, you check it out here.
Follow these steps to remove the carburetor:
- Begin by turning off the gas tap or clamping off the fuel line as before
Gas Off – Turn gas off
Remove – Remove engine covers to gain access to the carburetor


Remove – Remove carb mesh filter
Remove – Remove gas line


Remove – Remove carb fasteners
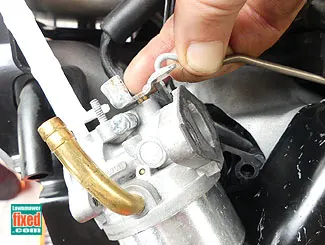
Remove – Remove the carburetor links by turning the carburetor 90°. Before doing so, take a picture of the link hole locations, which helps for the rebuild later.

Stripping Snowblower Carburetor
As said earlier, we’ll need carb cleaner to nail the cleaning procedure, and some small-carb cleaning brushes would be nice but not essential. Before cleaning the carb, we’ll need to strip it.
If you need video help, check out the video here covering the whole process, it’s a lawnmower engine, but the process is very close to identical.
Follow these steps:


Remove – Remove bowl
Remove – Remove float pin, float, and valve


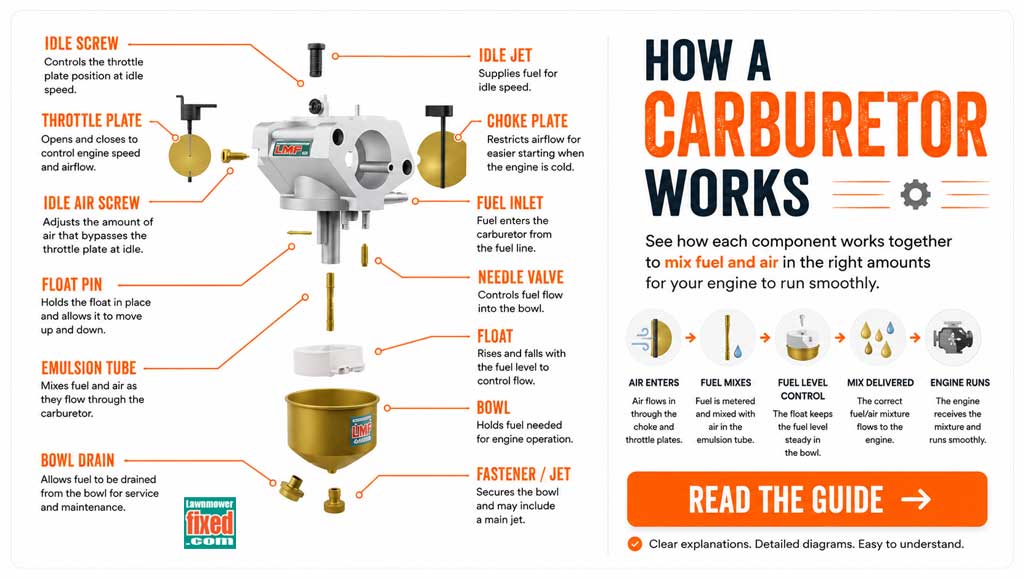
Remove – Remove idle jet if fitted. To remove the idle jet, the idle screw must be removed. Count the number of turns to remove the idle screw; you’ll refit to the same number later.
Remove – Remove the Emulsion tube. You’ll need a good-fitting flat-head screwdriver; the jet and tube are made from brass and are easily damaged.


Remove – Remove the fuel mix screw, but count the number of turns before removing. You’ll refit the screw later to the same number of turns.
Cleaning Snowblower Carburetor
An ultrasonic tank is the best way to clean a carburetor, but strands from a wire brush and some patients works too. But you’ll need to be thorough. The wire strands are great for the tiny passageways of the emulsion tube and fuel feed jet.
Carburetor cleaner is excellent at removing gum deposits. You’ll find all you need here on the “Snowblower tools page.”


Many Briggs engines employ a bowl bolt that doubles as a jet. These guys are famous for blocking up and causing no starts and surging. Make sure it’s really clean.
Use the wire brush strand on the portholes of the Emulsion.


Use your carb cleaner
Clean the idle jet in the same fashion (if fitted)


Spray all passages of the carburetor, including the idle jet port, fuel feed port choke plate, air-fuel ports, and passageways.
Now go ahead and rebuild and refit in reverse order. I included some tips below, and this video (internal link) covers the whole process.
Rebuilding & Refitting Carburetor Tips
Before refitting the clean or new carburetor, it’s best to check the gas flow from the tank. Poor flow indicates a bad gas cap or fuel filter blockage.


Most engines will have a bottle gas filter in the gas line, which is easily changed. Others may use a filter concealed in the fuel line at the tank, and others may still employ a mesh screen at the bottom of the gas tank.
Use a sealable container to catch the stale gas, and release the fuel line clamp to test flow.
If your snowblower gas is older than one month, now’s the time to drain it off and change that gas filter.
Rebuilding the carburetor isn’t much of a challenge; it’s the reverse of what we just did. However, refitting the gaskets and seals to their correct location and refitting the fuel adjustment screw and the throttle adjustment screw to the correct number of turns is important.
Use your phone pictures as a guide when refitting the choke and governor arms; these arms are easy to get wrong.
Turning the carburetor sideways will help attach the governor and choke arms.
When fitting the gas bowl, be careful to check the bowl seal is in place and resist overtightening the bowl fastener.
Attach the fuel line, fill the tank with fresh gas, turn the gas on, and check the line and bowl for leaks.
Remember to refit the breather hose to the rear of the air filter housing before fitting.
Clean the mesh air filter.
How to Avoid Carburetor Gumming
To avoid the problem of stale gas next season? Easy! Simply add a gas stabilizer to your snowblower gas tank towards the end of the season.
The gas stabilizer is an additive for gasoline. It keeps the gas fresh for up to 2 years and can be used in all small engine kit Lawnmowers, outboard motors, dirt bikes, ATVs, and two-stroke engines like hedge trimmers, chainsaws, weed eaters, etc.
Check out the mixing and adding gas stabilizer video here.


Every year I see more and more problems with stale gas. The issue is blended gas, the alcohol in the fuel is causing the fuel to degrade, and it also attacks the rubber components like seals and fuel lines.
A gas stabilizer will protect the rubber components. Also, it’s important to use it in ALL of your small engine kit.
When To Replace Snowblower Carburetor
Sometimes just looking at a carburetor is enough to let you know it needs replacing, but it’s not always apparent.
So here’s a short list of scenarios where I’ll pull the trigger and fit a new carburetor:
- I removed the carburetor, cleaned it, and refitted it correctly, and the engine still requires a choke to run smoothly
- I remove the bowl, and it’s filled with rust
- I remove the bowl, and it’s thick with white chalk, congealed or gummed gas
- If the carburetor is about the same or less than the cost of the labor and materials to clean it
- If the carburetor is more than ten years old
Order Replacement Snowblower Carburetor
The obvious way to order a new carb is to contact your local dealer with the snowblower product number and year of manufacture, but there is another way. Many manufacturers don’t actually make their own carburetors; they, in fact, buy them from carburetor manufacturers like Walbro, Zama, Tillotson, etc. Carb manufacturers make carburetors to suit many machines.
You likely don’t need to find the main dealer for your snowblower in order to buy a replacement carburetor. Many online retailers offer the same parts at better prices and deliver them to your door. Identifying your carburetor is easy. They are all marked with a part number. Simply match the part number.
I’ve listed many of the most common snowblower carburetors on this page, “Carburetor types” all conveniently delivered by Amazon.com.
About the Author
John Cunningham is a Red Seal Qualified automotive technician with over twenty-five years experience working on all types of equipment, grass machinery, ATVs, Dirt bikes, cars, and trucks. When not writing how-to articles, he may be found in his happy place – Restoring classic machinery.
You may find the following links helpful:
- Snowblower maintenance & repair page
- Riding mower maintenance & repair index
- Walk behind mower maintenance & repair index
- Recommended tools & parts
- Recommended mowers
- Repair videos
- About the Author
- Latest Posts


John Cunningham is a Red Seal Certified Tech with 25+ years of wrenching.
Bringing hands-on expertise to LawnmowerFixed.com, John writes practical repair and lawn care guides with a passion for keeping outdoor equipment running smoothly.