
By: Author John Cunningham. Published: 2021/06/14 at 10:06 am
Snowblowers have a tough life, or do they? When you think about it, they spend more than half the year sitting idle, and that’s often the root cause of no spark. I’m a mechanic, and snowblower no-spark is a common complaint; for most, the fix is simple.
A fouled spark plug is the most common cause of a snowblower without a spark. Cleaning and gapping or replacing the spark plug will fix the problem. Other likely causes of snowblower no spark include:
- Faulty control switch (on/off switch)
- Failed coil/armature
In this post, you’ll learn how to diagnose and fix the top three causes of a snowblower with no spark. You’ll learn how to clean and gap a plug, check the spark, test the control switch, and test & replace the coil/armature.
Fouled plug common cause of no starts


Snow Blower Cold Engine Starting Procedure


- Key “On”
- Gas tap “On”
- Throttle set to “Run”
- Choke “On”
- Press primer bulb three times
- Yank the cord
Testing Snow Blower Spark
I know you tested the spark plug and found no spark, but it’s worth noting testing for a spark without a test tool is sometimes hit-and-miss, especially if you are testing solo.
Viewing the plug while yanking on the cord can be tricky, and you know, if the plug doesn’t ground, it won’t spark.
I recommend using a spark test tool; the tool does a better job than a spark plug as it stresses the coil/armature, which causes it to work extra hard to fire the tool. In a test situation, this is exactly what we want. You can find the test tool I use here on the “Small engine tools page.”
Diagnosing Snow Blower No Spark
In this section, I will show you how I test for spark, both with and without a spark test tool. You’ll need a few basic tools, they include:
- Insulated pliers (plastic coated handle)
- Plug tool or ratchet & plug socket
- New plug
- Helper
- Spark test tool (optional)
Testing without test tool
To nail this successfully, a helper and a new spark plug are advised.
Follow these steps:


1 Remove – Remove the plug wire (twist and pull) and remove the spark plug. You may need to remove some plastic engine covers.
Check – Check the plug gap isn’t closed and the plug is clean. (See cleaning and gapping the plug below)


2 Refit – Refit the spark plug wire to the now loose spark plug.
3 Hold – Using insulated pliers, ground and hold the plug against the engine or any bare metal (unpainted)


4 Pull – Have the helper perform the start sequence (crank engine)
5 Check – View plug tip for spark action


Result
If the plug fails to spark, suspect a faulty coil/armature. A faulty control switch is possible and should ideally be eliminated before condemning the coil. However, switches don’t normally give a ton of trouble; coils do.
Testing spark with inline ignition test tool
Obviously, a test tool is required, and a helper would be nice; this process is very similar to testing without the test tool.
Follow these steps:


1 Remove – Remove the plug wire (twist and pull) and remove the spark plug.
You may need to remove some plastic engine covers.
Check – Check the plug gap isn’t closed and that the plug is clean. (See cleaning and gapping the plug below. Now, set the plug aside.
2 Ground – Fit the plug wire to the test tool and ground the test tool on any bare metal.


3 Pull – Have the helper perform the start sequence (crank engine).


4 Check – View the test tool window for spark.
Result?
If no spark is present, suspect a faulty coil. A faulty control switch is possible but less likely; in any event, it should be eliminated before condemning the coil. As said earlier, coil failure is more likely. Switch and coil testing and replacement are covered below.
If you need video help, check out “Mower spark test video.”
Cleaning & Gapping Snow Blower Spark Plug
Spark plugs have a difficult job; a combustion chamber is a pretty hostile environment. A plug needs to operate at a sufficiently hot temperature so as to burn off contaminants and yet not so hot that it ignites the fuel mixtures prematurely.
Although spark plugs all look identical, they are optimized for particular temperatures, and each plug type is coded. That code indicates a special set of parameters, including its optimal operating temperature.
This is a long-winded way of saying plug type is super important. Fitting the wrong plug can cause all sorts of problems.
Just some of the problems include:
- Hard starting issues
- Hot starting issues
- Flooding
- Rough idle
- Lack of power
- Misfiring
- Surging
- Black smoke
- Plug fouling
- Burning plugs


Check Plug Type – I never assume the plug type I remove is correct; check the plug code in the operating manual.
Cleaning Snow Blower Spark Plug
Cabon build-up at the electrode happens; however, it really shouldn’t. As said earlier, a plug that collects sooty or oily deposits on the tip could suggest the wrong plug type fitted. It could also indicate other problems, common among them include:
- Bad gas
- Dirty air filter
- Bad carburetor
- Too much oil added
- Worn out engine
Cleaning a plug is easy.
A wire brush is the best way to approach it. Check out the “Spark plug cleaning video” here.


After cleaning the carbon, or oily deposits, electrical contact cleaner works to remove oily residue.
Alternatively, use a hot flame to burn off the oil. If you need video help, check out “Spark plug cleaning video.”
That’s it; it’s clean. But before fitting, it makes sense to check and adjust the gap. That’s what we’ll do next.
Gapping Snow Blower Spark Plug
Gapping the plug is, as its name suggests, checking the gap in the electrode. The wider the gap, the stronger the spark and the harder the coil has to work to jump the gap. As we said earlier, each plug type has a particular gap size. It is important as it is paired with the engine’s electrical system.
A gap that’s too big may cause misfiring and premature coil failure. A gap that’s too small, on the other hand, could cause a weak or no spark, constant plug fouling, no starts, temperamental starting, flooding, and the list goes on.
Four-stroke engines
Typical spark plug gap for a four-stroke engine is about .030″.
- Snowblower engine
- Walk behind mower
- Tractor mower
- Zero-turn mower
- Tillers
- Generators
- Power washers
Most snowblowers are four-stroke engines, but the gap is a little smaller if yours is a two-stroke motor.
Two-stroke engines
Typical spark plug gap for a two-stroke engine is about .020″.
- Chainsaw
- Week whacker
- Hedge trimmer
A spark plug gapping tool is an inexpensive measuring (inches and mm) tool worth having in the toolbox.


All the common sizes are marked clearly on the tool. It’s simply a matter of checking the gap size for your plug type and adjusting the gap by either opening the gap (use pliers or tool) or closing the gap (by tapping) until the tool fits snugly between the electrodes.
Not any more complicated than that.
If you need video help, check out “Gap mower spark plug video”
Testing Snow Blower Control Switch
The snowblower control switch is basically the on-off switch. They’re simple and, as a result, rarely cause problems.
How does switch work?

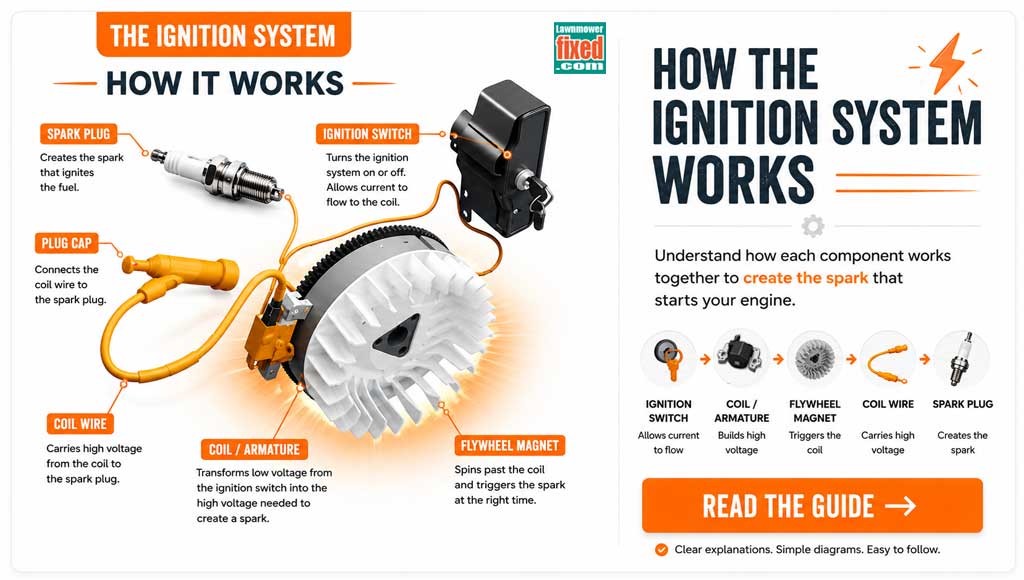
The story begins with the flywheel and coil. The flywheel (attached to the engine crankshaft), with a magnet attached, passes the stationary coil with every revolution of the engine.
As the flywheel passes the coil, it excites the copper windings inside. The voltage is increased by the coil primary and secondary copper coils and exits via the plug wire in search of ground.
The voltage is constantly searching for the shortest and easiest path to the ground. The spark plug offers a path to the ground, but because of the gap, it’s not perfect. It must jump the electrode to find ground and, in doing so, creates a spark.


A coil control wire is added to offer the voltage a shortcut, which diverts voltage from the plug and shuts the engine down. This wire is connected to the On/Off switch.
So the ignition system is a basic system with few moving parts and little to go wrong. That said, chafing or rodent damage to the control wire or plug wire can cause the wiring to ground, and as you know, that will offer the coil the shortcut it’s in search of.
If voltage finds a shortcut, it never reaches the plug, so it doesn’t create a spark. A rubbed through the wire is possible, especially on machines that create a ton of vibration. So that’s what we’ll test for next.
Check the wiring for signs of damage, or use a DVOM to check continuity when the switch is in the on position.


Place the meter on Ohms and place one test lead on the coil side of the switch and the second probe on the ground.
With the switch set to “Run” or “On,” the meter should read (open). If you get a reading other than open, the circuit is shorting to ground.
This switch is good.
Now the switch is in the Kill or off position (key removed in the picture). This offers the coil a much shorter, easier path to the ground.
The coil voltage is directed away from the spark plug, and it stops firing – the engine stops. Testing resistance will show continuity when the switch is set to off.
This switch is good.


A simpler way to test the wiring is by elimination; removing the coil wire and testing for spark will indicate either an issue with the coil or the wiring, but that does entail removing the blower assembly cover.
Testing Snow Blower Coil/Armature
To test the coil, the resistance of the internal coils could be measured, but I prefer to test it the old-school way. The simplest way is to remove the ground control wire. The control wire offers ground to the coil, and by disconnecting it, we eliminate the possibility of a wiring issue.
Coils are solid-state units; they can’t be repaired. So testing in this way removes all the variables from the equation. Many engine manufacturers place a quick-connect wiring terminal by the side of the engine. Disconnecting isolates the coil.
Quick Disconnect – If your snowblower doesn’t have it, you’ll need to remove the blower cover to access the coil wire.
If you need video help, check out the “Checking Spark video” here.


The process is as follows:


1 Remove – Remove the blower housing (cover)
2 Remove – Remove coil control wire


3 Check Spark – Now reassemble and check for spark as before.
Result
If you now have a spark, you’ll need to go back and check the wiring circuit; there’s a short to ground.
The more likely outcome is still no spark – go ahead and replace the coil; it’s faulty.
Check out common coil prices on the Amazon link below.
Amazon Snowblower ArmatureReplacing Snow Blower Coil/Armature
Replacing the coil isn’t a difficult job, and for most, it won’t take more than one hour. No special tools are needed. However, a feeler gauge would be a great asset, and if you choose to use the feeler gauge, you’ll need to check the coil air gap spec. The whole process is covered in this video; check out the “Checking Spark video” here. It’s a mower engine, but the process is identical.
Tools you’ll need:
- Feeler gauge (optional)
- Ratchet set
- Screwdriver set
- Wrench set
The following is a stepped process; your steps may differ slightly; although snowblower engines are similar, they aren’t identical.
Removing the coil/armature:


1 Remove – Remove the blower housing (cover).
2 Remove – Remove plug wire.


3 Remove – Remove coil control wire
4 Remove – Remove the coil fasteners (2)


Fitting the coil/armature:
5 Fit – Fit new coil in place but don’t tighten just yet.


6 Fit – Fit feeler gauge between the coil and the flywheel (circled in red); alternatively, use a business card instead, approx. correct.
7 Push – Pushing the coil firmly against the flywheel, tighten the fasteners.


8 Fit – Fit the coil control wire.
9 Remove – Remove the feeler gauge (business card).
That’s it. Reassemble in reverse order. Nice work you!

- About the Author
- Latest Posts


John Cunningham is a Red Seal Certified Tech with 25+ years of wrenching.
Bringing hands-on expertise to LawnmowerFixed.com, John writes practical repair and lawn care guides with a passion for keeping outdoor equipment running smoothly.