
By: Author John Cunningham. Published: 2019/01/31 at 8:09 pm
Checking and adjusting valve lash is often forgotten, even by the pros. Your mower engine valve lash is important; when the lash is out it puts an unnecessary load on other components.
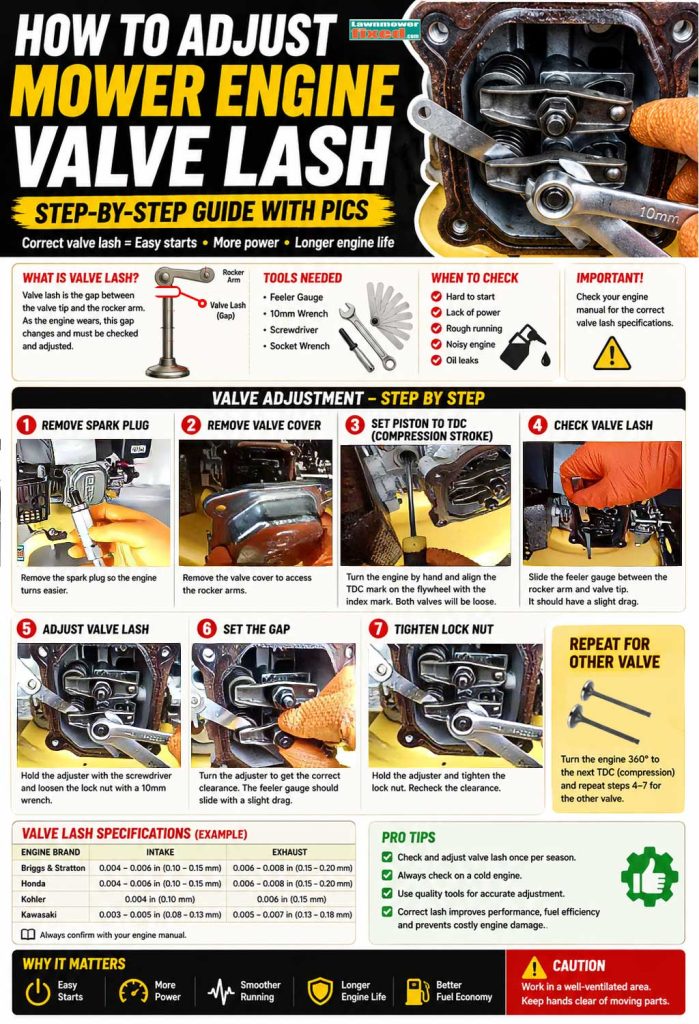
So, what is lawnmower engine valve adjustment? Valve lash is a precisely specified gap between the valve tip and the rocker. As an engine wears, the valve lash (gap) gets larger and needs to be checked and adjusted.
In this guide, we’ll check and adjust the valves on a walk-behind mower; the same principles apply to tractor-mower engines, zero-turns, snowblowers, etc.
Checking and adjusting valve lash isn’t difficult, but there is a very particular procedure to follow. If you need video help, check out “Valve lash adjusting video” it walks you through the whole process step by step, from setting the engine to checking and adjusting lash.
What Are Valves?
All four-stroke single-cylinder engines have at least 2 valves per cylinder that open and close in a sequenced cycle. As an engine breathes, it inhales an air/gas mix through the inlet valve and exhales the spent gases through the exhaust (muffler) valve.


Stroke 1 – Air/gas mix enters the cylinder through the open inlet valve.
Stroke 2 – Air/gas mix compressed in the combustion chamber. Valves closed.


Stroke 3 – Air/gas mix ignited by the spark plug. The piston is now under power. Valves closed.
Stroke 4 – Spent gases are now released by the opening exhaust valve.


Most valves are driven by pushrods and/or camshafts, all of which are connected and timed to the crankshaft. The push-rods open the valves by pushing the rockers, which in turn push the valve tips. The clearance between the valve tip and the rocker is known as valve lash.
Most, but not all, engines have adjustable lash; some are factory-set and don’t allow adjustment. (Kawasaki twin-cylinder tractor engines). If you have an OHV engine, it’s most likely that you have valves that need adjusting.


OHV – Usually stamped on the valve cover or on the engine cover.
Hard To Pull Starter Cord
A hard-to-pull starter cord is a common symptom associated with excessive valve lash. The reason the starter cord can be hard to pull is because of excessive cylinder compression. Most mowers will have a compression release mechanism; its job is to open the valves a little early, releasing cylinder pressure. This makes pulling the starter cordless physically demanding.
At 350 rpm, the plug fires and the engine starts; the release mechanism is then deactivated by a centrifugal flyweight. A faulty mechanism will cause a hard-to-pull starter cord, but it is a much less likely cause than an excessive valve lash.
Other reasons the starter cord is hard to pull:
- Blade obstruction – broken branches, dry grass, etc.
- Faulty pull assembly
- Hydro-locked cylinder – faulty carburetor needle
- Faulty flywheel brake
- Broken flywheel key
- Internal engine damage – bent crankshaft
Valve Adjustment & Hard Starting
Hard starting isn’t always caused by excessive valve lash, but it should be checked once per season. When the valve clearance is out of spec, the valve train timing is out. The whole valve train is running behind, and this can cause other issues, such as blown head gaskets and oil leaks.


Gasket – Excessive cylinder pressure causes the gasket to fail.
Valve Adjustment & No Start
No starting may be caused by poor valve lash, damage to valve train components, or wear. A sticking valve is a common complaint on engines that lay up for long periods. The symptoms will be a no-start and no compression.
If your engine is lacking compression, suspect a sticking valve. To fix a sticking valve – use a screwdriver to gently lever the spring into the released position. Check out the sticking valve video here.


Test – A compression test will confirm if your engine is at the end of its life. Check out the compression test video here, and if you need a compression test tool, check out the Amazon link below.
Amazon Compression Test ToolEngine Just Lacks Power
Excessive lash will cause your engine to underperform and use more gas. Depending on how bad it is, you may also hear a tapping noise. If ignored, it will cause the engine to wear out prematurely. When the lash is off, the engine isn’t breathing correctly; it’s always off balance and may sound rough. A simple adjustment will have it sounding sweet again.


No Oomph – No power, hard on the gas, and it’s hard to start.
How To Adjust Lash
If you have an OHV engine and are experiencing any of the symptoms, then yes, it’s worth checking. In this guide, we will check and adjust the lash (gap) between the valve tip and the rocker arm.
Overhead valve single-cylinder engines have two valves and two rocker arms. The Intake valve opens when the rocker arm pushes it, allowing fuel and air into the cylinder. After combustion, the exhaust valve opens to allow gases out; this operation is sequenced.
An inexpensive tool called a Feeler gauge is needed to set the valve lash, and you’ll find it here on the “Small engine repair tools” page.
Each engine manufacturer will have a different spec for their engines; intake and exhaust measurements will sometimes also differ.
Check your valve lash spec with your engine maker.
- Briggs and Stratton specification
- Honda specification
- Kohler specification
- Kawasaki specification


OHV – How do you know if you have an OHV engine? In most cases, it will be stamped on the rocker cover. This is the cover at the very front of the engine. It may also be printed on the plastic engine cover.
Remove – Remove the plug and turn off the gas if the fuel tap is fitted.


Remove – Remove the rocker cover; a rag will be needed as some oil will drip out. The metal rocker cover will have a gasket; if not damaged, it may be reused. Ideally, it should be replaced.
Valves & Rockers – Have a helper rotate the engine while you watch that both valves are compressing and releasing in turn.


Pushrod – Rotate the engine by turning the blade and observe that both valve springs are being compressed in turn. Note that the pushrods are in place and undamaged. These won’t be fitted if your engine is overhead cam (OHC), but all other info applies.
Pushrod – Pushrods should be straight; it’s not uncommon for them to bend, causing a no-start condition. Replacing is a simple job. I have removed it for demonstration purposes. DO NOT REMOVE PUSHRODS TO ADJUST VALVES.


Intake – Locate the intake valve; it will be in line with the intake manifold and carburetor.
Muffler – This is the exhaust valve, seen here, adjacent to the muffler (exhaust).


Rotate – Rotate the engine clockwise (as seen from above) by turning the blade. Keep turning until the intake valve spring is fully compressed (valve open). This is the first stroke of the 4-stroke sequence.
Set – Insert a blunt object into the plug hole against the piston. Turn clockwise again and watch as the blunt object is pushed out by the piston. When fully out, it’s known as Top Dead Centre (TDC) and is the 2nd stroke (compression).
Keep turning until the blunt object starts to enter the cylinder, by approx. 1/4 inch. Note that both valve springs are unloaded. This is the beginning of the 3rd stroke (Power stroke). This is where we adjust valves.


Gauge – Measured in Metric and Imperial. The exhaust and intake clearances will differ. The exhaust valve lash is usually larger as it gets hotter. Valve clearances vary by model, so check with your engine manufacturer.
Check – Slip the gauge blade between the rocker arm and the valve tip. Move the gauge forward and back and feel the resistance. If you feel a nice amount of resistance, meaning the gauge is snug but does move when you push on it, you’re good; there is no need to adjust this valve. If you don’t feel any resistance, start adjusting.


Locknut – Here I am holding the adjuster nut (inner nut) with a wrench (in the rain). The lock nut (outer nut) must be released before I can turn the adjuster. Your engine valve setup may differ, but the idea will remain the same. In some cases, the adjuster grub screw will be a small Torx head or other variation.
Some engines may have located the lock nut on the inside and the adjuster on the outside.
Adjust – With the gauge in place, turn the adjusting nut about 1/8 turn and check the gauge. In most cases, only small adjustments are needed. Here I am turning the adjuster in small amounts while checking the gauge. You may have to use a wrench to adjust.


Tighten – When you are happy with the amount of resistance, hold the adjusting nut in place with the wrench and tighten the lock nut.
Rotate – Rotate the engine 1 turn (360°) and check again; readjust if necessary. Some valve setups can be tedious to get right, hang in there, it’ll pay off.


Repeat – Now repeat the process for the intake valve, noting that the gauge size may differ.
Refit – Most of the time, you can reuse the old gasket, but be careful not to over-tighten the cam cover, as it can cause it to leak. If you need to replace them, gaskets other than cork can be replaced with a silicone gasket maker.
That wasn’t so bad!
Related Questions
What does OHV mean on a lawnmower? OHV stands for overhead-valve; it’s an engine layout where the valves are positioned directly above the combustion chamber. This provides a smoother running, more power, and fuel efficiency.
Briggs & Stratton stuck exhaust valve? This can happen to mowers when they lay up over winter. Trapped moisture between the valve stem and sleeve can cause corrosion and make them stick. Removing the valve cover and tapping them lightly with a piece of wood or a rubber hammer will free them.


- About the Author
- Latest Posts


John Cunningham is a Red Seal Certified Tech with 25+ years of wrenching.
Bringing hands-on expertise to LawnmowerFixed.com, John writes practical repair and lawn care guides with a passion for keeping outdoor equipment running smoothly.
Henrique
Monday 17th of February 2025
Hi, What simple OHC cam engine is this in the last pictures? Do you know the brand ? Looks exactly like mine which is a 139cc, but I can´t find the brand (for replacement parts) and valve specs. Thanks !
Leon
Friday 10th of May 2024
My new model 500 E briggs mower doesn't have lock nuts on the valve adjusters, now what?
David
Thursday 29th of February 2024
I have a B&S Twin V Tec. I set The LASH at .004. I think it calls for .005. Do I need to change it to .005? It is a 2015 Husqvarna lawn tractor.