
No Fluff. Just the Fix.
Module A: Correct Starting Sequence & Pre-Checks
A surprisingly common reason a mower won’t start is simply not following the correct sequence. Don’t worry—it’s easy to miss a step, especially when switching between mower types.
Here’s a quick refresher to make sure everything’s in order:
✅ Step-by-Step Starting Checklist


Check the Oil Level
Make sure the oil is between the minimum and maximum marks on the dipstick.
Low oil? Some engines won’t fire as a safety measure.
Check for Fuel
Confirm there’s enough fresh fuel in the tank.
Fuel older than 30 days can prevent starting—even if the tank is full.


Turn the Fuel Tap ON (if fitted)
Find the tap under the fuel tank and switch it to “ON.”
Prime or Choke the Engine
- Primer bulb? Press it 3–5 times to feed fuel to the carburetor.
- Manual choke? Set the choke lever to “CHOKE.”
- Auto choke? No action needed—just proceed.


Pull and Hold the Bail Lever
This is the safety lever and engine brake.
If it’s not held firmly, the engine will not crank or start.
Pull the Starter Cord with Force
Use a firm, confident pull. If it doesn’t start after a few attempts, wait a moment—you might have flooded it.


🧰 Extra Tips


If your mower has a throttle, make sure it’s set to FAST or START.
Place the mower on a flat, clear surface—not deep grass—for easier pulling.


If the cord feels stiff or stuck, check under the deck for a jammed blade or clog.
If you need more info on starting a mower, check out this post – How to start Honda mower


✅ If you’ve done all the above and the mower still won’t start…
Go back to the flowchart and continue to ➡️ Step 2: Is the fuel fresh?
Module B: Drain Fuel Bowl & Refill with Fresh Gas
Old, stale fuel is one of the most common reasons a mower won’t start. Even if your tank looks full, if the gas is over 30 days old—or contaminated—it can clog the carburetor and prevent starting.
Here’s how to safely drain the fuel and give your mower a fresh start:
✅ Step-by-Step Instructions
Turn Off the Fuel Tap (if fitted)
This stops fuel flow before you disconnect anything.


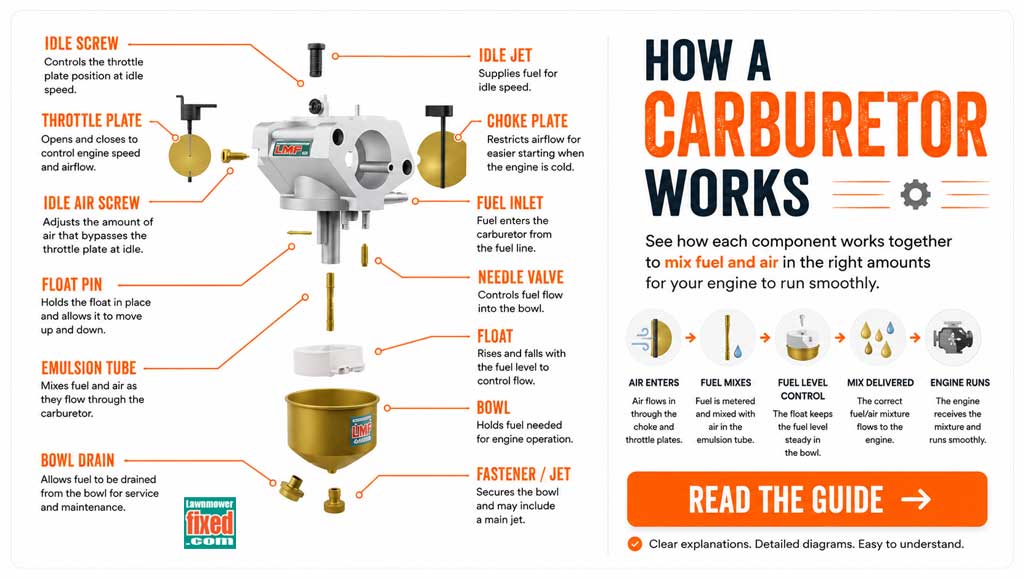
Locate the Carburetor Bowl
- The carb bowl is a small metal bowl at the bottom of the carburetor.
- It usually has one bolt in the center (the drain bolt), but some have two.
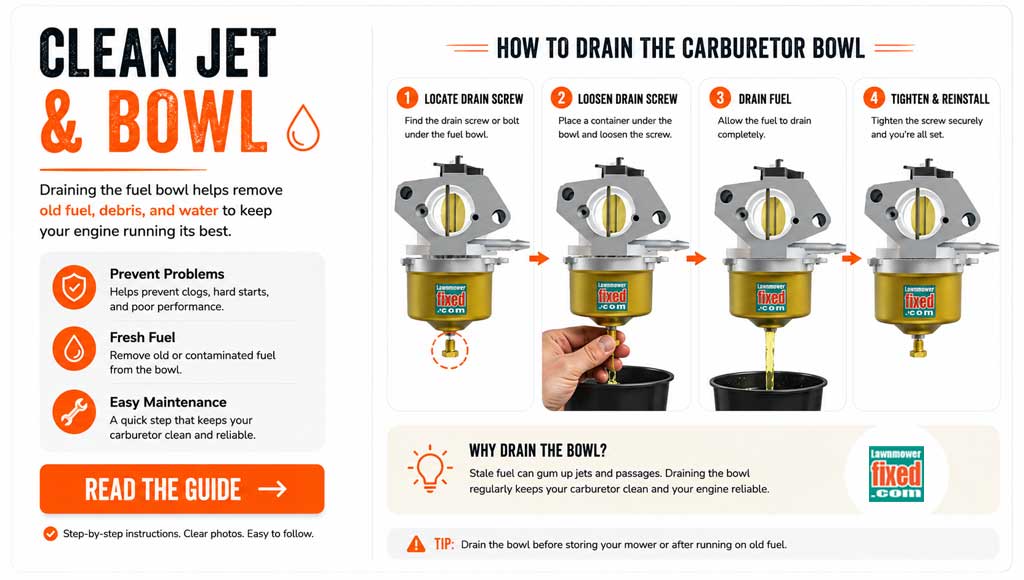
Drain the Fuel
- Place a container under the carburetor to catch the old fuel.
- Carefully loosen the bowl bolt or the drain screw (if equipped).
- Allow all fuel to drain out of the bowl and fuel line.


Drain the Tank if Needed
- If the fuel is very stale or contaminated, siphon or drain the entire gas tank too.
Tighten the Bowl Bolt
- Once drained, retighten the carburetor bowl bolt snugly but don’t overtighten.


Refill with Fresh Gas
- Use clean, fresh gasoline—preferably ethanol-free or with a fuel stabilizer if available.
🛠️ Tools You’ll Need
- Small wrench or socket set
- Catch container for old gas
- Fuel siphon (optional, for tank draining)
If you need more info, check out this video – Drain gas bowl
⚡ Important Safety Tips
- Always drain fuel outdoors or in a well-ventilated area.
- Keep fuel away from sparks, flames, or ignition sources.
- Dispose of old gas properly—check local regulations.
📌 Pro Tip
“If you’re draining old gas, it’s a good idea to also replace the fuel line filter if your mower has one. Tiny bits of debris from old fuel often hide there and cause trouble later.”
✅ Fuel drained and replaced?
Go back to the flowchart and continue to ➡️ Step 3: Is the air filter clean and dry?
Module C: Air Filter Cleaning or Replacement
A clogged, soaked, or heavily soiled air filter can choke your engine by restricting airflow to the carburetor, causing hard starting or a no-start condition.
Luckily, it’s an easy fix you can check in minutes.
✅ Step-by-Step Instructions


Locate the Air Filter Housing
- Find the plastic cover on the side of the engine (usually secured with a clip, wing nut, or small screws).
- Remove the cover to access the air filter.
Inspect the Air Filter
- Paper Filter: Look for heavy dirt buildup, oil saturation, or tears.
- Foam Filter: Check for dirt, oil soaking, or crumbling foam.


Clean or Replace the Filter
- Paper Filters: Tap gently to remove loose dirt. If heavily dirty or torn, replace it.
- Foam Filters: Wash with warm, soapy water. Rinse thoroughly, let dry completely, then lightly oil before reinstalling.
Test Start Without the Filter (if unsure)
- Briefly run the engine without the filter installed.
- If it fires up, airflow was your problem. Replace the filter immediately after the test.


Reinstall or Replace the Filter
- Ensure the filter is properly seated before securing the housing.
🛠️ Tools You’ll Need
- Flathead screwdriver (sometimes)
- Mild dish soap (for foam filters)
- Replacement filter (if necessary)
Need more info on air filter replacement check out this video – Mower blowing black smoke
⚡ Important Safety Tips
- Avoid running a mower for long periods without an air filter—it risks engine damage.
- Make sure a foam filter is properly oiled (but not dripping) before reinstalling. Do not oil paper filters.
📌 Pro Tip
“If your mower floods with gas or blows black smoke and sputters, a dirty air filter is often to blame. Remove the air filter and try starting, if she now runs fine clean or replace the filter.”
✅ Air filter checked or replaced?
Go back to the flowchart and continue to ➡️ Step 4: Is the spark plug in good condition and securely connected?
Module D: Plug Inspection, Cleaning, Gapping & Refit
The spark plug is a critical link in starting your engine. A fouled, worn, incorrectly gapped, or loose spark plug is a very common cause of a mower failing to start.
Here’s how to inspect and fix it properly.
✅ Step-by-Step Instructions


Locate and Remove the Spark Plug
- Pull off the spark plug boot (grip firmly—don’t yank the wire).
- Use a spark plug socket and wrench to loosen and remove the plug.
Inspect the Spark Plug
- Good Plug: Light tan or gray deposits; minimal wear.
- Bad Plug: Black and sooty (carbon fouled), wet and oily, cracked ceramic, heavy corrosion, or burned tip.


Clean or Replace
- Lightly fouled plugs can be cleaned with a wire brush.
- Severely fouled, damaged, or old plugs should be replaced with a new one.
Check and Adjust the Gap
- Use a spark plug gapping tool to check the gap (refer to engine specs; most walk-behind mowers are around 0.030″).
- Bend the ground electrode gently to adjust if needed.


Reinstall the Spark Plug
- Thread it in by hand first to avoid cross-threading.
- Tighten snugly with a socket wrench—do not overtighten.
- Reconnect the spark plug boot securely.
🛠️ Tools You’ll Need
- Spark plug socket and ratchet
- Wire brush (for cleaning)
- Spark plug gap tool
- New spark plug (if replacement needed)
If you need more help on spark plug gapping or cleaning, check out the following videos:
⚡ Important Safety Tips
- Always unplug the spark wire before working on the engine.
- If unsure about plug condition, it’s cheap insurance to replace it.
📌 Pro Tip
“Even a brand-new mower can suffer from a factory mis-gapped spark plug. Always check the gap—it’s a two-minute job that can save hours of frustration.”
✅ Spark plug cleaned, gapped, or replaced?
Go back to the flowchart and continue to ➡️ Step 5: Do you see a spark when tested with a spark tester?
Module E: Kill Switch, Ignition Coil & Spark Troubleshooting
If your mower still has no spark after inspecting, cleaning, or replacing the spark plug, the next step is to check the ignition coil and kill switch circuit.
The ignition system is simple—but small faults like a shorted kill wire or a failed coil will stop everything.
If you prefer to watch a video on testing the system, check it out here – Check mower spark
✅ Step-by-Step Instructions


Access the Ignition Coil
- Remove the engine cover or blower housing to expose the ignition coil (located near the flywheel).
- Keep screws organized for easy reassembly.
Locate the Kill Wire
- Find the small wire plugged into the side of the ignition coil.
- This wire grounds the coil to stop the engine when you release the bail lever.


Test for Ground Wire Short
- Temporarily unplug the kill wire from the ignition coil.
- Loosely reassemble the pull cord housing (enough to pull the cord safely).
- Reconnect the spark plug and test for spark again: Use a spark tester or hold the plug against the metal engine block while pulling the cord.
Interpret the Result
If you now see spark:
➔ The ignition coil is good.
➔ The problem is a short to ground somewhere in the kill switch wiring (bail lever cable, connector, or wire insulation).


If you still have no spark:
➔ The ignition coil itself is faulty and must be replaced.


Final Steps
- After testing, reconnect the kill wire before final reassembly.
- If replacing the coil, ensure correct air gap to the flywheel (typically about 0.010″–0.014″) using a feeler gauge.
I’ve covered the coil replacement process here in this video – Checking spark & replacing coil
🛠️ Tools You’ll Need
- Screwdriver or socket set (for engine cover)
- Spark tester
- Feeler gauge (for coil replacement)
⚡ Important Safety Tips
- Never pull the starter cord without the engine cover secured in place.
- Keep fingers and tools clear of the blade when testing spark.
📌 Pro Tip
“Coils can fail without warning—but kill wire insulation rubbing through is a possible no spark reason too. Always check for grounding faults first before replacing parts.”
✅ Spark restored?
Go back to the flowchart and continue to ➡️ Step 6: Does the engine feel like it has compression?
Module F: Compression Test & Flywheel Key Clues
If your mower shows no spark issues and fresh fuel, but still refuses to start, low or no compression could be the real problem.
Luckily, you don’t need fancy tools to get a quick idea.
✅ Step-by-Step Instructions
1. Quick Compression Test (The Thumb Test)
- Remove the spark plug.
- Place a gloved thumb firmly over the plug hole.
- Gently pull the starter cord.
What you’re feeling for:
- Good Compression: Strong pressure or vacuum against your thumb.
- Bad Compression: Little to no resistance — you won’t feel any pressure.

If compression feels weak or missing:
➔ You may have a sticking open valve, especially common after winter lay-up.
2. Fixing a Sticking Valve
- Locate and remove the intake valve cover (often held with a few small bolts).
- Gently press each valve with your hand or soft tool.
- A stuck valve will free itself with a little movement.
- Refit the cover and retest compression.


I’ve covered inspecting valves in this video – Sticking valve inspection
3. Sheared Flywheel Key Symptoms
If compression seems okay but the starter cord violently snaps back when you pull it, suspect a sheared flywheel key. This typically happens after the blade strikes a hard object (like a tree stump or curb).
Why it matters:
The flywheel key keeps ignition timing correct.
When it shears, spark timing goes out of sync—causing backfires, kickbacks, or no-start conditions..


I’ve covered inspecting and replacing the shear key in detail right here – Checking Shear-key
🛠️ Tools You’ll Need
- Socket set (for spark plug and valve cover)
- Gloves (for thumb compression test)
- Soft mallet (optional for valve cover removal)
⚡ Important Safety Tips
- Disconnect the spark plug wire before handling any moving parts.
- Be cautious when removing covers—gaskets may be fragile.
📌 Pro Tip
“If the starter rope snaps out of your hand hard, always check the flywheel key before replacing expensive parts. It’s a cheap and simple fix once caught early.”
✅ Compression checked? Valve freed? Timing issue ruled out?
Go back to the flowchart and continue to ➡️ Step 7: Perform the Gas Shot Test.
Gas Shot Test
If your mower has good spark, good compression, and fresh fuel but still won’t fire, it’s time for a gas shot test.
This simple check helps confirm if the carburetor is the issue—or if you need to dig deeper into spark or compression.
✅ Step-by-Step Instructions


Prepare for the Test
Remove the air filter.
Alternatively, remove the spark plug for direct fuel entry.
Apply the Fuel
Spray a small amount of carburetor cleaner into the carburetor intake or
Add a teaspoon of fresh gas directly into the spark plug hole (using a syringe, straw, or small bottle cap, funnel, etc).


Reassemble
If using the spark plug method, reinstall the spark plug and reconnect the wire.
If spraying into the carb throat, leave the filter off temporarily.
Attempt to Start the Mower
Pull the starter cord firmly and listen carefully.


🔍 Interpret the Result
- If the engine fires briefly or tries to run:
➔ Carburetor is dirty or blocked.
➔ Fuel wasn’t reaching the combustion chamber properly — time to clean or rebuild the carb. - If there’s no fire at all:
➔ Suspect deeper spark, compression, or timing issues.
➔ Recheck previous steps, especially flywheel key and ignition coil.
🛠️ Tools You’ll Need
- Carburetor cleaner spray
- Fresh gasoline
- Small container or syringe
- Screwdriver (to remove air filter housing if needed)
I covered the process in this video – Gas Shot Test
⚡ Important Safety Tips
- Only use small amounts of carb cleaner or gas—never flood the engine.
- Perform the test outdoors or in a well-ventilated area.
- Keep fuel sources clear of sparks or flames.
📌 Pro Tip
“The gas shot test is one of the fastest ways to tell if your problem is fuel-related. If the mower fires up—even briefly—you’ve just saved yourself hours of guessing.”
✅ Completed the gas shot test?
If it doesn’t: Recheck ignition and compression modules.
If it fires: Go to Module G: Carburetor Cleaning or Replacement
Did the Engine Fire Briefly?
When we say the engine “fired briefly,” we mean the engine tried to start — even if it only ran for a second or coughed once before dying.
Signs the Engine Fired Briefly:
- A loud “pop” or sharp bang from the exhaust
- The engine sputters, coughs, or runs for a second before cutting out
- You feel a strong kick through the starter cord when pulling
If you hear or feel any of these, it means the engine was able to burn the small amount of fuel you gave it — confirming that spark and compression are likely OK.
Module G: Dirty Carb – Time to Clean or Replace
If your gas shot test caused the engine to fire briefly, it means spark and compression are good — and the problem is fuel delivery.
In almost every case, that points to a dirty or blocked carburetor.
Cleaning it properly can get your mower running like new again.
✅ Step-by-Step Instructions
I’ve covered the carburetor removal and cleaning process by engine model, and you can check these out below:
B & S Intek and Quantum Carb Cleaning
🛠️ Tools You’ll Need
- Screwdriver set
- Socket set
- Carburetor cleaner spray
- Fine wire (for cleaning jets)
- New gaskets (optional)
⚡ Important Safety Tips
- Work in a well-ventilated area.
- Keep fuel sources away from sparks and open flames.
- Always turn off the fuel valve (if fitted) before removing the carburetor.
📌 Pro Tip
“Most ‘dead mowers’ after winter storage are suffering from clogged carb jets. A good clean fixes 90% of no-start issues without buying a new carb.”
✅ Carb cleaned and reinstalled?
Try starting the mower again following the correct start procedure from Module A.
If it starts and runs well, you’re good to go!
If it still won’t start, double-check your work.
If everything checks out, revisit Module H: Spark, Compression, and Timing.
Module H: Recheck Spark & Compression / Timing
If you’ve followed every step — fuel, spark, compression, timing — and your mower still won’t start, here are a few extra checks that are often overlooked:
✅ 1. Check for Flooding
- After repeated starting attempts, the engine can flood with fuel.
- Signs: Strong gas smell at the exhaust, wet spark plug.
- Fix: Remove the plug, dry it off, let the engine air out for 15–30 minutes, and try again with no choke.
✅ 2. Confirm Fresh Fuel is Really Reaching the Carb
- Double-check that fuel is actually flowing from the tank to the carb.
- Kinked, blocked, or cracked fuel lines can prevent delivery even if the tank is full.
✅ 3. Kill Switch Cable or Bail Lever Issue
- A sticking bail lever switch can sometimes ground the coil even after you think you’ve tested it.
- Make sure the bail lever fully releases and the kill cable isn’t damaged or sticking internally.
✅ 4. Low-Quality Aftermarket Parts
- Cheap aftermarket spark plugs, coils, or carbs sometimes fail right out of the box.
- If you recently replaced parts and it’s still dead, consider trying OEM parts if you can.
✅ 5. Look for Air Leaks
- Cracked intake manifolds or loose carb gaskets can cause massive air leaks and prevent starting.
- If your mower pops but won’t keep running, inspect carb mounting bolts and gaskets.
⚡ Quick Reminder
- Always double-check that the spark plug wire is fully seated.
- Make sure the fuel tap is turned on (easy to forget after draining!).
- Rethink the starting sequence—one missed primer shot or choke position can make the difference.
✅ If you’ve rechecked everything and still no joy:
At this point, it may be time to consider a deeper mechanical issue (worn valves, serious internal damage) or consult a professional.

- About the Author
- Latest Posts


John Cunningham is a Red Seal Certified Tech with 25+ years of wrenching.
Bringing hands-on expertise to LawnmowerFixed.com, John writes practical repair and lawn care guides with a passion for keeping outdoor equipment running smoothly.