
By: Author John Cunningham. Published: 2020/12/22 at 5:31 pm
Pushing a mower isn’t fun, especially a self-drive model; they’re even heavier. But help is at hand, and you are in the correct place for self-drive repair. I’ve been a mechanic for over twenty years, and I’ve repaired a ton of these types of issues.
A mower wheel won’t turn for three common reasons:
- Drive belt worn
- Drive cable broken or needs adjustment
- Wheel worn
In this post, you’ll learn how to diagnose why your mower wheels won’t turn, and you’ll learn how to fix them right now.
1 Mower Drive Belt Worn
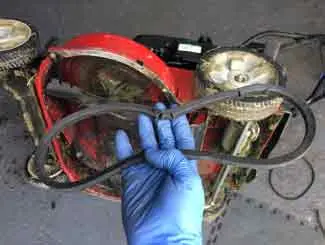
Mower drive systems are driven by a belt and two pulleys. The belt is fitted to the engine’s crankshaft pulley, which drives a second pulley on the transaxle. The drive belt works really hard; despite this, they tend to last years without issue. Belts, of course, wear out over time; no big surprise there.


Worn/loose drive belt.
A worn belt commonly results in the belt:
- Breaking
- Becoming loose
- Constantly jumping off
Common symptoms of a worn-out drive belt include:
- Mower won’t move
- Mower slow
- Mower slows on hills
Checking The Belt
To check the belt, the mower will need to be turned on its side. But before we do that we’ll need to make it safe to work on and for that, we’ll remove the spark plug wire and turn the gas off (to prevent accidental starting).
Gas tap – If your mower has a fuel tap, turn it off. You can read all about finding and using your fuel tap here “Mower fuel shut off valve”.


A mower may only be turned over with the carburetor side facing upwards. Turning a mower incorrectly will cause the engine to flood with gas and oil, possibly preventing the mower starts.


Turn over – Mower carburetor side up, need help finding carburetor side? I wrote a post about turning your mower over correctly, and you can read about it here, “Which way to tilt your mower”
Is Belt On Both Pulleys, Loose or Worn Out?
Most mowers are rear-wheel drive so the transaxle is located at the rear wheels. All mowers employ a shield on the underside of the deck, it protects the belt, pulleys, and transmission from flying debris.
You usually don’t need to remove the shield in order to verify if the belt is on the pulleys, your view is obscured, but you should see enough. However, to replace a belt the cover will need to be removed. Have your WD40 to hand as old grass eats the shield bolts.


The belt on Pulley’s – With the mower turned over, air filter side up, check the belt is fitted around the transaxle pulley and crankshaft pulley.
Tight – If the belt is around both pulleys, go ahead and check it’s tight. A loose belt won’t transfer power. It may be loose because it’s worn or there may be a missing component such as a tension spring or perhaps the transmission itself employs an adjuster to remove belt slack by pivoting the transmission.
Many basic drive systems are adjusted by removing slack from the drive cable (see below).


Worn Out – A worn belt is the root cause of many self-drive problems.
If the belt is in place, tight, and in good condition, then move on to the next section; the belt isn’t the reason your mower wheels aren’t moving.
If, on the other hand, your belt is loose, broken, or has jumped off, you’ll need to replace it. It’s possible to refit a jumped-off belt, but you’ll soon be refitting again. Belts usually jump off because they are worn out.


New Belt – Fitting a new belt is a job you can take care of, however, some mowers are challenging to work on. Many will require blade removal, and some may require partial removal of the rear axle.
You may find this video helpful “Self drive troubleshooting”, which includes fitting a drive belt.
2 Mower Drive Cable Needs Adjustment
Mowers use a belt and pulleys to get power from the engine to the axle, but all that power is useless without control. Power is controlled by way of a transaxle lever, attached cable, and bail lever at the handlebars.
Cables are just like bicycle brake or gear cables, they are a two-part component – black outer casing with a steel braided inner cable, and like a bicycle brake cable, they stretch out and break over time and need adjusting and eventually replacing.
All good drive cables will have a user-friendly adjuster that allows for easy drive cable adjustment.
How To Check If Your Mower Drive System Needs Adjustment?


Test – To check if your drive cable needs adjustment, apply the drive bail lever at the handlebars and drag the mower backways.
If the cable is adjusted correctly, the drive wheels will lock; if they slip, we’ll need to adjust. This whole process is covered below or check out “Self drive troubleshooting video”
How To Adjust The Mower Drive System?


Locate – First locate the drive cable, and follow the cable from the transaxle to the bail lever to confirm you have identified it correctly.
Now look for an adjuster screw, commonly it’s at the handlebar anchor where the cable fixes to the handlebars, otherwise an inline adjuster may be fitted.


Open – All adjusters incorporate a lock nut. Open the lock nut and adjust the outer cable to remove slack from the inner braided cable.
Adjust – Lengthen outer to remove inner braided cable slack.


Test 1 – Before tightening up the lock nut, check by applying the bail lever and pulling the mower backways (as before). Wheels should lock, and readjust until they do.


Test 2 – When it’s adjusted, pull the mower backways again, this time without the bail lever applied.
The wheels should turn freely if they don’t, back off the adjuster until they do. Now your drive cable is in the sweet spot, go ahead and tighten the locknut.
Your work here is done.
Check out this post, “Honda self propelled slow” it covers a Honda drive adjustment in greater detail, but all mowers run similar setups. If you need video help check out the “Self drive troubleshooting” which covers many of the common problems.
3 Mower Wheels Worn
Most mower wheels are made from plastic, and many use plastic gear inside the wheel. The axle drive gear, which is metal, wears away the plastic wheel drive gear, and the mower drive slips at first before eventually losing drive altogether. The only fix is to replace the wheels, most wheels are inexpensive, but some Honda wheels can be spendy.
To check the drive wheel, we’ll need to remove them. A single fastener in the center of the wheel removes them. However, a plastic wheel cap will likely conceal the fastener. A flat screwdriver will pry loose the cap. Loosen and remove the fastener, and the wheel pulls off.


Check – Check the gears inside the wheel; if they’re worn, you’ll need to replace them. Best to replace both axle wheels. This is a Honda wheel, and the gear is metal; they last longer than the plastic teeth but will wear out too.
Check out “Fitting a wheel video”
Drive Gear and Pin Wear
Drive Gear – While the wheel is off, go ahead and check the drive gear and axle pins. They wear out on older mowers, learn more in this post, “Honda mower slow” or, if you need video help, check out “Self drive troubleshooting,” which covers wheel and drive pin replacement from start to finish.


Axle Pins – Axle pins transfer power from the axle to drive gear are under constant stress, and are a common drive fault. Replacing is all covered in “Self drive troubleshooting”
If you need new wheels, check out the Amazon link below.
Amazon Lawnmower Wheels

- About the Author
- Latest Posts


John Cunningham is a Red Seal Certified Tech with 25+ years of wrenching.
Bringing hands-on expertise to LawnmowerFixed.com, John writes practical repair and lawn care guides with a passion for keeping outdoor equipment running smoothly.