
By: Author John Cunningham. Published: 2019/01/08 at 3:38 pm
Before we assume there’s a problem, let’s take a minute to check that we’re following the correct starting procedure. All mowers will have safety sensors fitted, and if the sensors are open, they won’t start.
So why won’t your lawn tractor start, not even a click? The most common reason for a no start, not even a click sound, is a totally flat battery, but other likely causes include:
- Transmission in Drive
- Brake Pedal not Pressed
- Blade Switch / Lever On
- Not Sitting in Seat
- Bad Battery Connection
- Sensor Faults
- Flat / Faulty Battery
- Main Fuse Blown
- Faulty Ignition Switch
- Faulty Control Module
A tractor mower won’t start if the blade lever/button is on, manual mowers need to be in Neutral gear, and some mowers won’t start if the oil level is low or the hood is open.
If you are in any doubt about the correct starting procedure for a lawn tractor, check out – “How to Start Husqvarna Ride-on Mower.”


If you do hear a click sound when you turn the key, check out – “Mower Wont Start Just Clicks.”
Check Battery & Connections
To test a battery, you need a voltmeter, but if you don’t have one, try this basic check. If your mower has hood lights or dash lights, go ahead and turn them on. If they light up and are bright, your battery is most likely not the problem.
Dash Lights are Dim


Check – Check the battery cables; they should be clean and tight. When connections are loose or corroded, it prevents available power from flowing to the starter.
Charge Battery – If your battery is completely flat, it will take a couple of hours and will require a battery charging hack, or check out this smart battery charger the NOCO Genius1 on Amazon.com.


Jumpstart Mower – This is the fastest solution, but it may not be the long-term fix. (see Jump starting below)
Battery Check Hack
- Turn on the lights to check for power supply
- If they work – the battery is likely OK
- If lights are dim – check battery cables
- If cables clean and tight – charge battery
- If you have no lights – check battery with a voltmeter


Volt Check – A voltmeter is needed for this test. Check battery voltage – 12.65v is 100%, 12.30v is 70%, and 12.05v is 50% charged. This battery needs a charge.
Very low volts indicate the battery is likely faulty, and it may not recharge. To test a battery, it must be charged, so a battery charger may be required. However, it is possible to jump-start the mower (see below), and given time, the mower’s alternator will charge the battery, assuming it isn’t faulty.
Once the battery is sufficiently charged (about 70%), try the crank test.


Battery Crank Test – Attach the Voltmeter and crank over the engine; if the volts read less than nine, replace the battery. (The battery must be over 70% charged for running this test)
Check out the Amazon link below for quality mower batteries delivered to your door.
Amazon Lawn Tractor BatteryVoltmeter – If the lights don’t work at all, you’ll need to use a voltmeter to check the battery’s state of charge. You may have blown a fuse (see below).
If you have very low volts, the battery is likely faulty. The average life of a battery is four years, more if well cared for.


Jumper Cables
If you don’t have a charger, you can still get it running, but you’ll need a set of jumper wires, and a car or any 12-volt battery will do the job. Follow this link for a more detailed guide to Jump Starting.
Jumpers – Use good quality jumpers.


If you are unfamiliar with jump-starting, you’ll find a complete guide here, “Jump starting riding mower.”
Add the cables in sequence 1, 2, 3, and 4 to start the mower, and while idling, remove jumper cables in reverse order 4, 3, 2, and 1.
Dash Lights Don’t Work
Main Fuse – If the battery is fully charged and still no go – check the main mower fuse. Some mowers will have the blade-type fuse; others will have the old-style bottle type.


When the fuse blows, all power is lost; changing it is simple. It is important to replace the fuse with the correct amp rating. If the fuse keeps blowing, the rating is too low, or there’s a short-to-ground wiring fault.


Fuse Location – Places they like to hide include under-seat, under the hood, behind the fuel tank, and control module incorporated. Modules are usually under the dash panel.
Replacing the fuse is simple; just pull out the old one and push the new one into place. It’s important to replace it with the correct amp rating. Otherwise, you can damage the wiring circuit and components.
Check Safety Sensors
Riding mowers are designed with safety features built in to protect us from operator error or accident. Safety features on mowers are controlled by sensors/switches, and most modern mowers will wire those sensors into a control module.
The sensors are a very simple on/off switch type and rarely give trouble; it’s more common for the striking plate that pushes on the sensor to be misaligned; when this happens, the sensor is open, and the engine won’t start or stops depending on where the sensors fitted.
Over-riding – Sensors can be overridden for test purposes, remove and join the wires, and some sensors are wired in reverse – meaning, just disconnecting them will override the sensor. You can check the sensors for continuity using a voltmeter.


Starting Procedure
As you know, there’s a starting procedure that must be followed before your mower will start. You can check out the starting procedure here – “How to Start a Husqvarna Ride-on Mower.”
There are several sensors that must be engaged; the location and number of sensors are dependent on the make of the mower and differ between manual and hydro-static (type of transmission).
The main sensors are the brake pedal, seat, gear lever, and blade engage control switch or lever. Some models, such as John Deere, will have one fitted to the hood (Hood open—no start).


Safety – For our safety, sensors are fitted to the seat, blade engages lever or button, transmission selector, brake pedal, and on some models, the hood. Any of these sensors will prevent your mower from starting.
On older manual transmission mowers, the gear selector wears, and although the selector points to the Neutral position, it’s often still in gear – confirm it’s in Neutral by pushing it forward or back; it should be easy to push.
Sensors – This older style Craftsman / Jonsered / Husqvarna blade lever causes lots of no-start problems.
The lever spring gets weak and leaves the sensor in the open position which prevents starting.


Sensors – The quick fix, hold down the lever to start the mower. The complete assembly is available and not too difficult to fit. Check that all sensors are working, and look to see if the striker plates are closing the sensors fully.
Check wiring to sensors for chafing and that the connectors are secure and corrosion-free.
Check Control Module
Most modern mowers will have a Control module; they are a printed circuit with relays and resistors – they do give trouble. Because the specs vary, I can’t be more detailed.
The function of the control module is to receive a start/stop command from the ignition switch and only output a start command to the starter (via the solenoid) if all the correct sensors have been engaged.
Replacement modules can be on the spendy side, so it may be time to access your old mower; if she needs a ton of love in the blades bearing and belts department, it may be time to look at a new set of wheels.
Module – Wires come loose, have a helper attempt to start the engine while you wiggle the wiring connectors.
Check also for damage, water, or scorch marks on the panel itself.


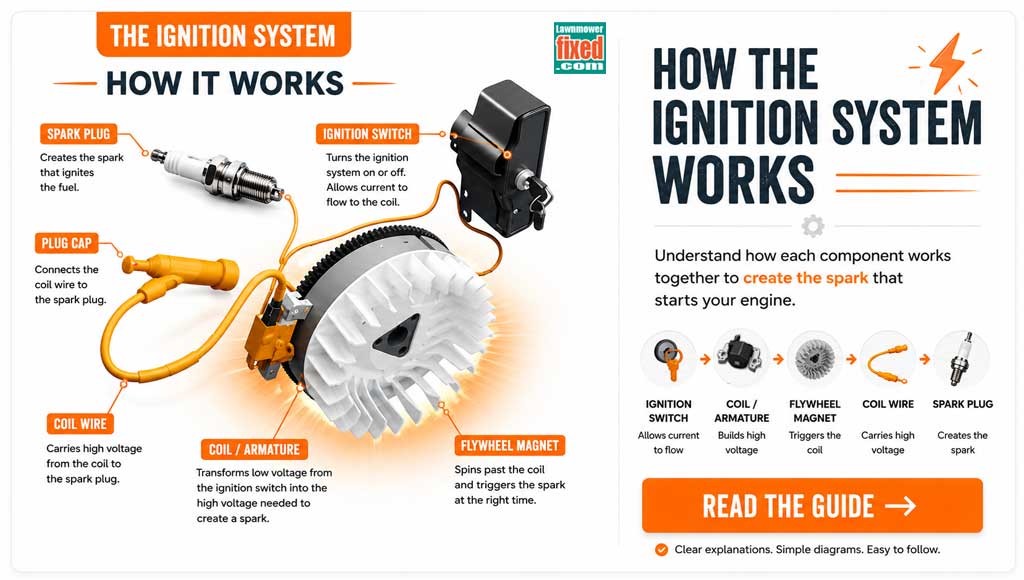
Check Ignition Switch
Ignition switches are an important part of the ignition system; bad connections here can cause lots of problems. Ignition switches – send commands to the control module if fitted.
If your mower doesn’t have a control module, then the safety sensors are wired inline to the ignition switch – meaning any sensor that is in the open position will leave the ignition switch with an open circuit (No start). These systems are basic and tend to be the most reliable.
Common Problems
Issues with ignition switches: loose wiring at the switch; corroded terminals; broken terminals; spinning ignition switches.
Wiring specs for ignition systems vary, so I can’t be more detailed. Check the ignition wiring for damage, corrosion, or loose wires. Have a helper sit on the mower and attempt to start it while you wiggle the ignition wires and connectors.
If you have a DVOM:
- Check ignition inputs – ground and 12-volt supply.
- Check ignition outputs – 12v to the starter solenoid (or to the control module, if fitted) when the ignition is in the start position.


Switch – Spinning ignition switches cause damage to the wiring and pins.
Corrosion is another common failure. This usually causes unreliable starting and shutdowns.
Wiggle – Try wiggling the wires at the back of the ignition switch while attempting to start the engine; you may need a helper. Often, wires simply come loose, but do check them for corrosion.


Related Questions
Lawnmower ignition switch problems? Common Ignition switch problems include:
- Spinning ignition switch
- Loose wiring
- Disconnected wiring
- Corroded wiring terminals
- Corroded/faulty switch

- About the Author
- Latest Posts


John Cunningham is a Red Seal Certified Tech with 25+ years of wrenching.
Bringing hands-on expertise to LawnmowerFixed.com, John writes practical repair and lawn care guides with a passion for keeping outdoor equipment running smoothly.