
By: Author John Cunningham. Published: 2020/12/21 at 1:24 pm
Head gasket failure is common, especially in hard-working older mowers. I’ve been a mechanic for over twenty years, and I’ve replaced a ton of them. Mowers aren’t complex; most repairs, including gasket replacement, are possible with just a little knowledge, and this post covers it all.
A mower head gasket is not difficult to replace. However, you will require a torque wrench to tighten the cylinder head to the correct specification; this procedure is crucial to successful head gasket replacement. To replace a mower head gasket, you’ll need to remove some components, including:
- Pull assembly
- Carburetor
- Muffler
- Valve cover
In this post, you’ll learn how easy it is to replace your mower head gasket and how to use a torque wrench. Before working on your mower, always remove the plug wire to prevent accidental starting.
Tools You’ll Need To Replace Mower Head Gasket
To successfully replace the head gasket, you’ll need the following tools:
- Wrench set
- Ratchet & socket set
- Screwdriver set
- Pliers (long nose best)
- Torque wrench (used to tighten cylinder head)
- Feeler gauge (used to set valve lash)
- Plastic scraper tool (used to clean cylinder head)
You’ll need the following supplies also:
- Head gasket
- Valve cover gasket or gasket maker
- Can of brake cleaner
Remove Mower Blower & Pull Assembly


Begin by removing the pull assembly. We need to remove the pull assembly as it allows us to access the cylinder head.
The pull assembly is, as its name suggests, the assembly that houses the pull cord and recoil. Some mowers will use a one-piece assembly (blower housing). Others employ a two-piece. Several fasteners (four usually) remove the complete assembly.
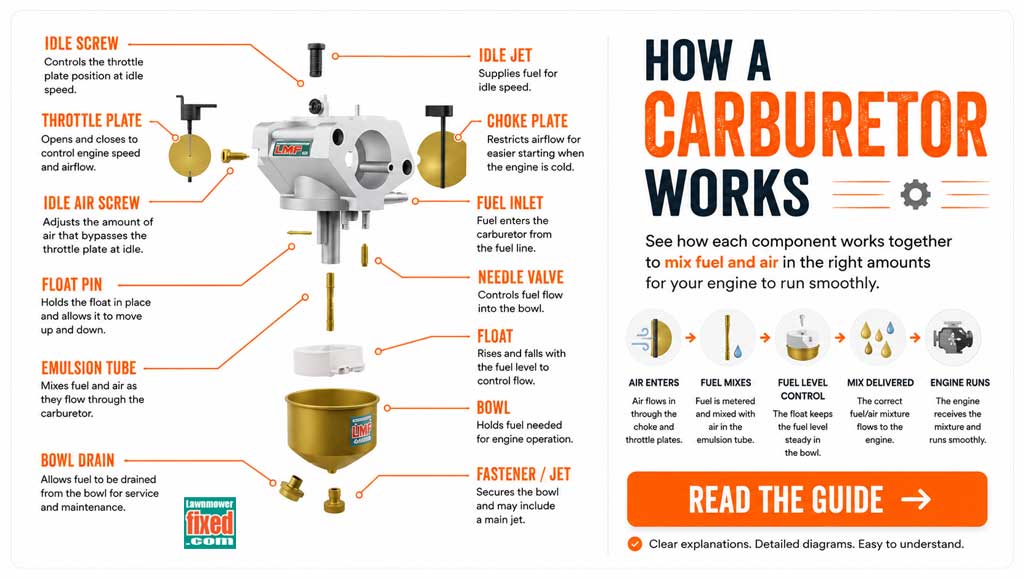
Remove Mower Carburetor
Remove the carburetor by first removing the air filter. You’ll also need to clamp the gas line or drain down the gas tank.
With the air filter removed and the gas line clamped, go ahead and remove the fuel line.
A couple of fasteners hold the carburetor to the engine; when you remove them, the carburetor will be free.


Note where the carburetor gaskets are positioned and their orientation; replacing these incorrectly may cause the carburetor to make an ineffective seal and result in a surging engine. With the gaskets noted, unhook the throttle springs by turning the carburetor sideways. Set the carburetor aside and store it carefully.
Remove Mower Muffler


Some mowers may not require the muffler removed, and if you can access the cylinder head bolts, feel free to leave the muffler in place.
If, on the other hand, you need to remove it, use caution; muffler bolts often break when removed.
If you can, spray some WD40 to help reduce the risk of breaking. Two bolts are common, and the bolts may employ a locking tab.
Remove Mower Valve Cover
The valve cover lives at the front of the engine and usually has OHV (Over Head Valve) embossed. To remove the cover, you’ll need to remove four fasteners. It is best to elevate the front of the mower engine; this helps prevent oil from flowing forward and out onto the mower deck.


Have a rag handy, as there’ll be some oil spills. Set the valve cover and fasteners aside. Note also the valve cover gasket may be damaged in the removal process; that’s just the way it goes. If that is the case, you’ll need to replace the gasket or use a heat and oil-resistant silicone gasket maker.
Remove Pushrods


Pushrods are metal rods used to push the rockers which open valves. The intake and exhaust rods may be different, note them before removing them.
To remove pushrods, depress the valve spring with your thumb and slide the rocker over the pushrod, freeing it. Note its location and orientation; as said, pushrods usually aren’t identical.


Remove Mower Head Bolts
The bolts (approx. six) are located on the cylinder head; some may be located behind the valve cover.


To remove the head, the head bolts must be loosened in a star sequence. Initially, each bolt is loosened by a quarter turn before moving to its opposing bolt. This prevents warping the cylinder head.
Remove The Mower Head
With all the bolts loosened and removed, you are now free to remove the cylinder head. You may need to loosen it by tapping it with a piece of timber, avoiding prying with a lever or tapping with a hammer.
Remove the head and set it aside carefully; alloy is a soft metal and will damage easily.


Cleaning Mower Head & Block


To prepare for the new gasket, both surfaces will need to be cleaned. Old gasket material tends to stick to the surfaces. To clean them, you’ll need to use a plastic scraper and avoid a metal scraper or wire wheel.
Metal tools will damage the machined surface and could cause premature gasket failure. Cleaning can be tedious, but a good scraper and some brake cleaner will clean it up in jig time.
Fitting New Mower Head Gasket
Fitting the new gasket is easy; most will only fit one way. Go ahead and fit the gasket to the engine; two dowels are employed to help locate the gasket and also the head.
Before fitting the cylinder head, clean the bolts using a wire brush, but don’t oil them.
Lubbing the bolts interferes with the torque measurements.


Mate the cylinder head with the block; be sure it seats correctly on the block dowels. Hand thread all the bolts into the head until they seat. At this point, we’ll need a torque wrench to nail the procedure correctly. It is not advisable to tighten without a torque wrench. Getting this part wrong risks warping the head and damaging the gasket.
Check out lawnmower head gaskets on the Amazon link below.
Amazon Lawnmower Head GasketUsing Torque Wrench To Tighten Mower Head
To use a torque wrench, you’ll first need the cylinder head specs. Every engine make is different, so you’ll need to check yours. Torque specs are measured in ft. lbs. (Feet Pounds) in the USA and Nm (Newton Meters) in Europe. Your torque wrench will have both measurements.


To set the wrench, first, loosen the lock, then turn the handle to the desired measurement and tighten the lock again.
The torque wrench is now set to a specific torque setting and will give an audible click when it reaches that measurement.
If you need video help on setting a torque wrench, check out “Setting a torque wrench video” or I wrote a complete guide on buying and using a torque wrench; check out “Best torque wrench for mower blades.”
When all head bolts are tightened by hand until seated, using a torque wrench and socket, tighten each bolt in a star pattern. Star pattern simply means tightening bolts in an opposing sequence (avoid tightening adjacent bolts sequentially).
Fit Push Rods
When tightened, the pushrods will need to be fitted; be sure you are fitting the correct rod.
Insert the rod into the block until it seats against the camshaft, now depress the valve spring using your thumb and slide the rocker onto the rod tip. Repeat for the second rod.


Ideally, valve clearance should be checked; it’s covered in the video library. Check out this post, “Mower engine valve adjustment” or check out the valve adjustment video here.
Reassemble now in reverse order; remember to replace the valve cover gasket, check, and top up the oil if needed. Job done, that wasn’t so bad!


- About the Author
- Latest Posts


John Cunningham is a Red Seal Certified Tech with 25+ years of wrenching.
Bringing hands-on expertise to LawnmowerFixed.com, John writes practical repair and lawn care guides with a passion for keeping outdoor equipment running smoothly.