
By: Author John Cunningham. Published: 2021/06/30 at 7:31 am
Aargh! Just when you need it, it lets you down. You are in the right place; this post will show you how to get the juice flowing again.
A generator that starts and then cuts out suffers from a dirty carburetor. Cleaning the carburetor will fix the problem.
In this post, you’ll learn how to correctly diagnose the root cause of the stalling and how to fix it. You’ll also learn some other less likely but possible causes of stalling.
Diagnosing a Stalling Generator Engine
As you have described the symptom so well, it is pretty clear the root cause of the stalling motor is a dirty carburetor. There are, as said, other possible causes, but we’ll deal with those later in the post as they are less likely.
I routinely diagnose dirty carburetors just by how the customer describes the symptom.
But here are a few other clues that we’re on the correct track:
- The generator hasn’t been started in a few months
- The gas in the tank smells off
- A gas sample looks yellow
The only way to know for definite is to pull the carburetor bowl and check for dirt. In some cases, simply removing, cleaning, and refitting the gas bowl is all that’s required to fix the issue, which is great because that’s a ten-minute job.
However, most carburetors will, unfortunately, require removal, teardown, and cleaning before they’ll sing in tune. Now, that’s a bigger job altogether, but don’t be discouraged; it’s doable for the DIY mechanic to nail successfully with just basic tools.
Anyhow, it is worth trying the bowl clean before going to the trouble of a full carb strip, and so that’s what we’ll try right now.
Cleaning Carburetor Bowl
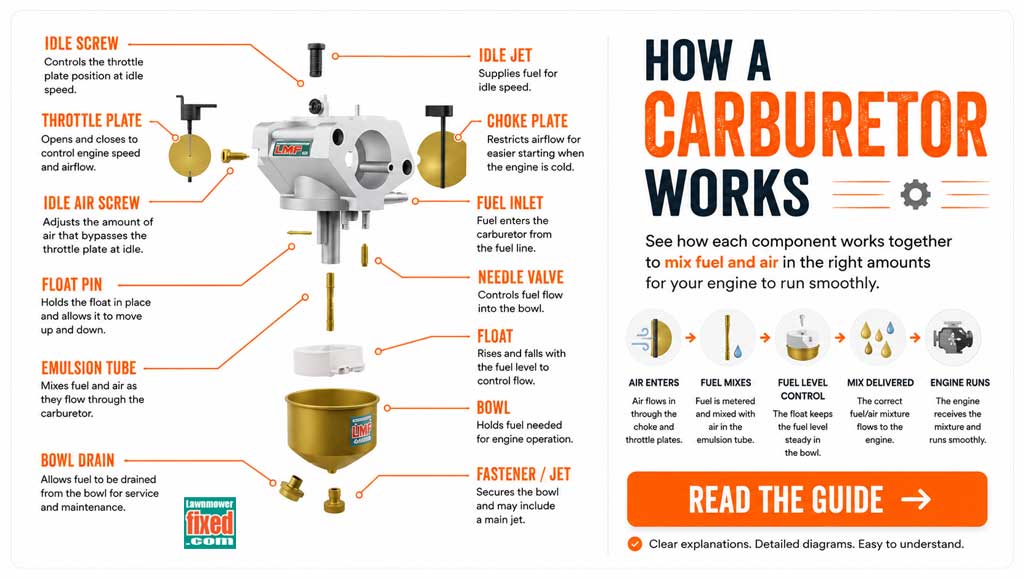
The carburetor bowl lives at the base of the carburetor. The bowl is so-called because of its shape. The bowl is a reservoir of gas that stands ready to feed the engine.
Dirt and debris collect at the base of the bowl. This is normal, as gas filters never catch all the dirt. To clean the bowl, we’ll need to remove it.
Best to move the generator outside or where there’s lots of ventilation. Gas will spill from the bowl, and it stinks.
Tools you’ll need include:
- Eye protection
- Shop rags
- Gloves
- Wrench set (8 or 10mm usually)
- Wire brush or carb cleaning brushes
- Can Carburetor cleaner
You’ll find all these tools here on the “Generator maintenance tools page.” You’ll find a video covering gas bowl cleaning here. It’s a lawnmower carburetor, but the process is the same.
When removing the gas bowl, the gas bowl gasket may or may not come off with the bowl. I advise not disturbing the bowl seal if possible. Removing them may distort their shape, which causes bowl leaks. If this happens, and sometimes it just does, you’ll need to replace the bowl seal.
The removal process looks like this:


Turn the gas tap off
Locate the bowl and place rags under the bowl


Loosen and remove bowl fastener (usually one 10 mm bolt)
Remove bowl (may require a gentle tap of screwdriver handle)


Fuel feed bolt – Some generator carburetor bowl fasteners may double as a fuel feed jet. You’ll identify them by the presence of portholes. If your carburetor sports this type of bowl bolt, it needs to be cleaned thoroughly with a strand of wire.
The bowl & bowl bolt cleaning process looks like this:


Check the bowl for dirt and wipe it with a clean cloth
Check the bowl fastener; some double as a fuel jet Clean using a strand of wire and carb cleaner


Spray carb cleaner into the emulsion tube
The refitting process looks like this:


Ensure the bowl seal is seated correctly
Position bowl and thread bowl fastener by hand, then snug bowl fastener using the wrench.
Turn the gas tap on and test.


If, after fitting, you find a gas leak from the bowl, try loosening and repositioning and snug the fastener again. Old bowl seals and gaskets often leak after being disturbed; you may need to replace both bowl and fastener gaskets.
If that works out for you, great! If not, we’ll need to move on and remove, strip, clean, and refit the carburetor. And that’s exactly what we’ll do next.
Carburetor Cleaning
Removing, stripping, and cleaning the carburetor will require some patience and a few more tools; the process is covered here in this post, or you can check out the video here. The video covers a lawnmower carburetor, but the process is close to identical.
The following will make the whole job move like butter :
Socket and ratchet set
Wrench set
Flat screwdriver
Needle nose pliers
Carb cleaner
Cleaning brushes
Wire brush
Siphon
Fuel line clamp
The carburetor removal process looks like this:
Turn the gas tap off
Remove air filter


Remove air filter housing
Clamp gas line and remove the line


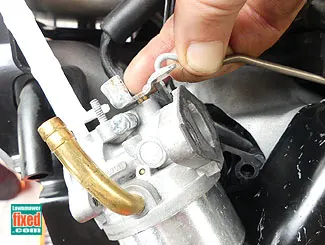
Photograph governor & choke lever linkage attachment locations and photograph carburetor gaskets and orientations
Remove carburetor and rotate sideways to aid governor and choke linkage release

The teardown process looks like this:


Remove gas bowl
Remove float and needle


Remove main jet (if applicable)
Remove emulsion tube


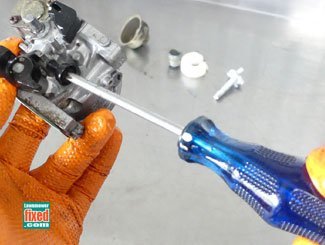

Remove idle adjuster screw. (if applicable) Count the number of turns to remove.
Remove the idle jet


Remove air-fuel mix adjustment screw (if removable, count number turns to remove)
Your carburetor air-fuel mix screw may be removable, or it may not. If it is, its location is important; count the number of turns when removing. Marking a screwdriver handle helps when counting the full turns.
clean carburetor
An ultrasonic tank does a fantastic job cleaning carburetors and small parts. A second-best option is a can of carburetor cleaner and some carb cleaning brushes; you’ll find both here on the “Generator maintenance tools page.”
The cleaning process looks like this:
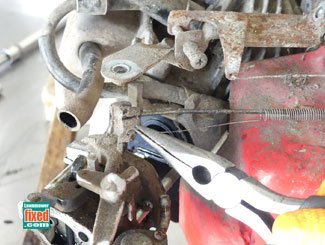
Using a wire brush strand, clean the portholes of the emulsion tube, main jet, and idle jet. Clean all the passages of the carburetor. Spray the carburetor passages thoroughly using the carburetor cleaner straw – idle jet passage, mix screw passage, fuel valve passage, butterfly, and choke plate.


Clean emulsion tube
Use carb cleaner


Clean main jet
Clean idle jet (if fitted)


Clean idle jet port (if fitted)
Spray carb cleaner


If your gas is old, and I mean anything older than a couple of months, then take this opportunity to drain it off. Place the loose fuel line into a suitable container and open the gas tap. Best to do this outside; gas will stink up your workspace otherwise.


Drain gas tank
Rebuild & refit carburetor


Rebuilding is, as you can imagine, just the reverse of the strip-down and removal process.
Mechanics Tips For The Rebuild Process
- Check the float valve tip for wear. A pink color or perished rubber means it’s time to fit a new valve.
- Refit the idle screw to the same number of turns counted on removal
- Refit the fuel mix screw to the same number of turns counted on removal (some aren’t removable, mine wasn’t)
- Refer to photos for both gasket location and orientation.
- Refer to the photo for governor, spring, and choke lever locations.
- In many cases fitting the governor and choke levers before mounting the carburetor is easier.
- Don’t over-tighten the carburetor fasteners.
- Replace the fuel line filter (if fitted)
That’s it; you nailed it; that wasn’t so bad!
Adding Gas Stabilizer
Modern gas is blended and doesn’t suit small engine fuel systems. Blended gas in small engine systems begins to go stale after just one month; in severe cases, the stale gas congeals and blocks up the carburetor. This problem may be avoided by using a fuel stabilizer.
The gas stabilizer is a special additive that keeps gas fresh for up to two years and protects the plastic and rubber fuel system components from the corrosive effects of ethanol.
Add gas stabilizer as follows:
- Add 1/2 oz. (1 tablespoon) to one gallon of gas
- Shake can well
- Fill the generator gas tank
- Run the engine to allow gas mix throughout the fuel system


You can find a link to the gas stabilizer I use and a video of how to mix it here on the “Generator maintenance tools page,” and you’ll find a video covering the subject here.
Other Possible Causes Of a Stalling Generator Engine
Carburetors fail, they are a carefully calibrated component, and when they wear out, they are trouble. Consider fitting a new carburetor, they aren’t expensive, and as you know, they aren’t challenging to fit either.
List of possibles :
- Water in the gas
- Blocked gas filter
- Collapsed gas line
- Blocked gas tank
- Choke fault
- Bad gas cap
- Blocked air filter
- Blown head gasket
- Valvetrain fault
I’ve added various links to relevant articles. They may or may not be linked to a generator post, but that’s ok, as all small engines are close to identical.
You may find these other generator posts useful:
Changed generator oil now won’t start
- About the Author
- Latest Posts


John Cunningham is a Red Seal Certified Tech with 25+ years of wrenching.
Bringing hands-on expertise to LawnmowerFixed.com, John writes practical repair and lawn care guides with a passion for keeping outdoor equipment running smoothly.
Patrick Loveall
Wednesday 8th of November 2023
My brother's 10kw General would start and immediately die. It was looked at by 3 mechanics before the cause was determined to be a defective muffler. A loose piece of metal inside the muffler was clogging the output. New muffler fixed it...