
By: Author John Cunningham. Published: 2020/03/10 at 2:23 pm
It was running fine when I put it away! As a small engine mechanic, I hear this complaint a ton.
So what’s wrong with a chainsaw that won’t start after sitting? The top five reasons your saw won’t start after sitting include:
On this page, you’ll learn all about the most common reasons your saw won’t start; you’ll learn how to diagnose your problem quickly and how to fix it. You’ll also learn my top tip to prevent this from happening ever again, guaranteed!
1 Bad Gas
Gas gets overlooked a lot. We always assume there’s a major problem with the oily parts of our kit, when, very often, the problem is pretty easy to fix. If your saw is new and won’t start, stale gas is likely your issue. Gas goes stale, and you may be surprised to know that it can go off in as little as one month.
It loses its Oomph; the symptoms include no starts, lack of power, bogging down, stalling, surging, and everything in between.
Lots of gas today is a blend of ethanol; this type of fuel attracts moisture, and that invites trouble. I advise all my customers to use gas stabilizers in all their small engine kit. It prevents the gas from going stale and prevents hard starting and gumming of the fuel system, a common occurrence in kit that spends a ton of time sitting idle.
May find the following links useful:
NOTE: Gas stabilizer is not a substitute for 2-stroke oil; you must continue to add the 2-stroke as before. You’ll find a link to the stabilizer I use here on the “Chainsaw repair tools” page.
When a customer shows up in my workshop complaining of a lazy starting saw after sitting, I’ll always suspect bad gas. I have a pretty good nose for bad gas.


If you suspect that your gas is older than one month, then go ahead and empty the gas tank, rinse it out, and fill it with a fresh mix of gas and two-stroke. For many saws, this is enough to get the saw recommissioned.
If this doesn’t work for you, then try the gas shot, and that’s what we’ll cover next.
Gas Shot
If, after refilling with fresh gas, the saw still won’t start, I’ll try a gas shot directly into the cylinder. Because sometimes bad gas needs a little help to flush from the system. Go ahead and try the gas shot.


Gas Shot – Remove top cover and spark plug.
Take a cap full (thimble size) of fresh gas and drop it into the cylinder.
Go ahead and try to start the saw in the normal way.
Result
Three outcomes are likely:
1 – Saw starts and stays running. You got lucky, and your work is done!
2 – Saw runs and stalls. Repeat the process 2-3 times, and if it continues to stall, you’ll need to remove and clean the carburetor (see clogged carburetor below).
3 – Saw makes absolutely no attempt to start. You may have an ignition system fault (see plug fault below).
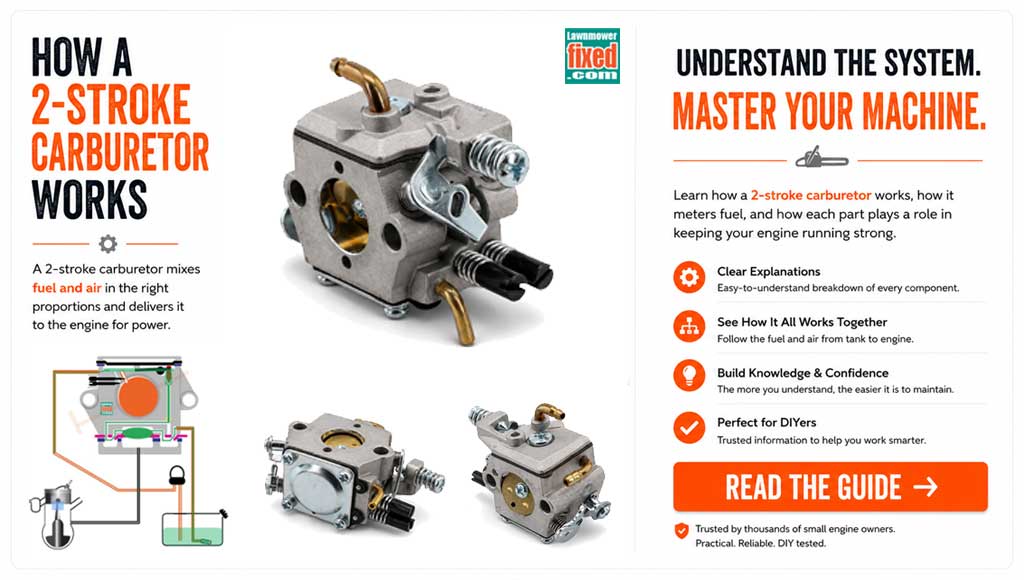
2 Clogged Carburetor
Unfortunately, we’re going to need to perform surgery on this patient. The stale gas has likely congealed inside the carburetor and blocked up tiny fuel passageways. It’s not uncommon to remove the carburetor and find it’s too badly damaged to repair. But more often, removing, cleaning, and replacing the carburetor gaskets is the fix.


Carburetors may sometimes need further diagnosis with some special tools, and for those types of head-scratchers, you may find this Carburetor diagnosis link helpful.
Carburetor repair kits include gaskets, diaphragms, needle valves, levers, and welch plugs. It’s good practice to replace gaskets, diaphragms, and needle valves since you will dismantle the carburetor anyway, but if your saw is only a year or two old, it is possible to reuse the same gaskets, etc.
As an alternative, just go ahead and replace the complete carburetor; as you’ll find in most cases, replacement carburetors aren’t expensive. New carbs come with a guarantee, tested, tuned, and ready to fire out of the box.
If I have any doubts about the carb I’m working on, I’ll bounce for a new one.
Removing the carburetor on some chainsaws is a pain in the ass, but for most, you’ll find it straightforward. Working on saws isn’t like working on your truck or even a mower. Chainsaw carburetor parts are tiny and real-estate-tight, you’ll need a little patience, but it’s all well within the scope of even the novice DIYer.
I’ve covered the carb repair process in detail with pictures and illustrations; you can check them out below.
- Carburetor removal
- Carburetor stripping
- Carburetor cleaning
- Carburetor gasket fitting
- Carburetor adjustment
Tools You’ll Need – Special carburetor adjuster tools will be needed for some saws, but other than that, just a selection of sockets, screwdrivers, carb cleaner, carb cleaning tools, and my special top tip – gas stabilizer additive to stop this from ever happening again.
You can check them all out here “Chainsaw repair tools.”


Replacement Carburetors
If you’ve decided to replace your carburetor, be sure to order the correct type. Your carburetor is calibrated to the power output of your saw. So, although a family of carburetors looks identical, they are different. You’ll find most saw manufacturers don’t actually make their own carburetors.


They use third-party, well-known, and trusted carburetor manufacturers like Walbro and Zama.
So when you have removed your carburetor, check the make and model stamped into the body of the carburetor. Then check out this page, “Chainsaw parts & tools” I’ve listed all the most common types.


After cleaning or fitting a new carburetor, clean your gas tank and fit a new gas filter (inside the gas tank).
3 Plug Fault
Plugs have a tough job, and they live in a hostile environment. They’re right there in the thick of all the action. Wedged in a hot cylinder next to a hot muffler, it’s no wonder they are number three on the list of possible causes.
You’ll find plugs are pretty tough components; they can work tirelessly for years without ever missing a beat.
A plug should be changed at the start of each new season, but I live in the real world, and most owners won’t give the plug a second thought so long as it’s doing its job. If you are treating your saw to a new plug, be sure to get the right one. Plugs come in different thread thicknesses, lengths, and heat ranges.


Check your make and model for the correct spark plug part number.
Checking Spark
A spark plug test tool is the best way to check the ignition system. The tool stresses the ignition system, and if it’s faulty, it will show up. Don’t have a spark test tool? Not to worry, we have a hack.
But first, we should remove the plug and inspect its condition often that gives us some clue as to what’s going on.


A wet plug indicates engine flooding (covered below) and a possible ignition system issue, and a dry plug indicates a possible fuel supply issue.
Checking spark without a test tool:


- Remove the spark plug and reattach the plug wire.
- Ground the plug body against the saws metal cylinder.
- Set the switch to “On” and pull start the saw.
- Observe the spark plug for spark.
When testing spark this way, I like to use a set of jumper cables to ground the spark plug securely, as a bad ground can lead to misdiagnosis. Here’s how I go about that:


- Remove & check spark plug condition and gap.
- Fit plug wire.
- Ignition On.
- Place ground jumper lead on engine & plug threads.
- Crank over the engine and check for spark.
Checking spark with an inline test tool:
- Remove the plug & inspect.
- Ignition On.
- Fit plug wire to the inline tester.
- Ground the inline tester.
- Pull over the engine and check the window for spark.


Result
Two outcomes are possible:
- You’ve got spark, great! All is good here.
- No spark. No spark at the plug doesn’t necessarily mean you have a major problem.
Check your plug; there should be a visible gap between the tip and the electrode. If the gap is closed, it will need to be gapped or swap out the plug for a new one or known good one.


Check out the “Spark plug gapping video” here. It’s for a lawnmower, but the process is identical.
The plug should be free from oil and carbon; if not, clean the plug using a wire brush. Check out the “Spark plug cleaning video” here.


Test Spark Again – If you have a spare plug or a known good donor test plug, swap it.
Now crank over the engine and check for spark again. Still no spark; you’ll need to check the coil (See below).
However, if you now have a spark, your likely issue was engine flooding, and we’ll look at what that is and why it happens next.
4 Flooded Engine
So what is flooding? It’s basically too much gas in the combustion chamber of the engine. Instead of the spark plug igniting the gas, the excess gas simply extinguishes the spark. No spark equals no fun!


So why does it happen? Flooding often happens when the engine is repeatedly cranked over without the engine actually starting.
It very often occurs as a result of another underlying problem, such as bad gas, bad spark plug, overuse of choke, or just a faulty carburetor. A saw that isn’t well maintained is prone to flooding.
So how can you fix it? There are three ways to fix a flooded chainsaw:


- Take a coffee break and let the saw sit for 30 min; the excess gas will evaporate.
- Remove the spark plug, dry it, and crank over the engine a few times to dry the cylinder, refit the plug, and try again.
- Set the switch to “On,” set the throttle to fully open, set the choke to “Off,” and crank over the engine. Expect the saw to start on the second or 3rd pull.
How can you prevent flooding? Make sure your gas is fresh, use a gas stabilizer, and your saw is tuned up; that’s a clean air filter, and the spark plug is correctly gapped.
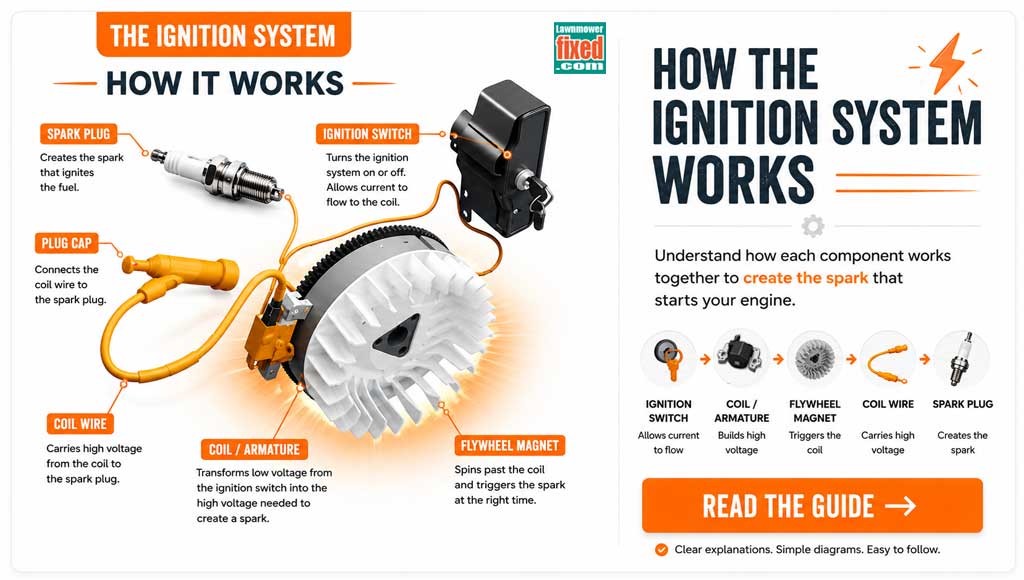
5 Faulty Coil/Armature
A faulty coil, also known as an armature, is a common failure. The armature with the flywheel creates the high voltage the spark plug needs to fire. Armatures commonly fail in one of two ways. They will often work OK when the machine is cold and then stop working as the machine heats up. Or, they’ll just stop working, period.
Testing The Coil/Armature
Testing the armature starts with the spark plug test we did earlier. Ideally, we would use a proper tool to test the ignition system. The test tool loads up the armature and will reveal any weakness; our hack with the plug resting on the engine isn’t foolproof.


Ignition systems employ only a few components; the main ones include the spark plug, coil, and the on/off switch.
Typically as you know, it’s the spark plug that causes the most issues; plugs are durable, but they do require a little maintenance – cleaning and gaping.

The next ignition system component most likely to cause issues is the coil itself or its wire or cap. The coil isn’t a repairable component, although the cap is usually replaceable.
The ignition system component least likely to cause issues is the switch. That’s because it’s a simple On/Off (Run/Kill) switch. A chafed wire, however, will cause a no-spark condition.


If you’d like to know more about how a coil works, check out – How small engine ignition system works.
Testing The Armature


Before testing, check over the coil wire and cap for signs of damage.
- Install the inline tester and crank over the engine watching the inspection window for a bright blue spark.


- Remove the pull assembly to access the coil control wire.
One final test to run, this test eliminates a possible shorting issue with the On/Off switch. Test as follows:
- Remove the control wire and refit the pull assembly.
- Now test for spark again.


Check out the test tool I use here on the Chainsaw repair tools page.
Result
Two outcomes are possible:
One
Still no spark? Assuming the coil air gap is OK, Go ahead and replace the coil.


I’ve covered the whole process previously, with pictures including setting the air gap, and you can check that out here – Replacing the coil.
Two
You now have spark? Check for shorting on the On/Off switch wiring (damaged wiring).


Damaged Wire – Check for a grounding of the control wire.
Constant vibration can cause the wiring to come loose and wear away the insulation exposing the core to a grounding, which, as you know, will cause a no-spark no-start.
You may find the following posts helpful:
Related Questions
How do you fix a seized chainsaw? A seized chainsaw will require a new cylinder head, piston and possibly a new crankshaft and con-rod. Fixing a seized chainsaw usually isn’t economically viable.
Should I rev a cold chainsaw? It is advisable to allow a chainsaw warm up before running at full throttle.
- About the Author
- Latest Posts


John Cunningham is a Red Seal Certified Tech with 25+ years of wrenching.
Bringing hands-on expertise to LawnmowerFixed.com, John writes practical repair and lawn care guides with a passion for keeping outdoor equipment running smoothly.