
After months of freezing temperatures, snow cover, and dormancy, your lawn may look weak, patchy, and lifeless. Instead of the lush green yard you remember, you are left wondering, “Will my grass ever bounce back?”


I have seen it happen time and time again—homeowners either wait too long or rush into lawn care without a plan, only to wonder why their grass is struggling to recover.
But the good news is, with the right steps, you can bring your lawn back to life quickly and prevent common setbacks.
In this guide, I will walk you through a simple, step-by-step plan to assess winter damage, prepare the soil, reseed, water, fertilize, and mow at the right time. By following this process, you will:
- Kickstart healthy growth and enjoy a green lawn faster
- Fix bare patches and prevent weeds from taking over
- Avoid costly mistakes that weaken your grass
The secret to a thriving lawn starts before you even pick up a rake. First, let’s take a closer look at why winter leaves your grass struggling—and what you should do before taking action.
Why Your Lawn Needs Special Care After Winter
Step 1: Assessing Winter Damage
Step 2: Raking and Clearing Debris
Step 3: Checking for Compacted Soil and Thatch
Step 4: Aerating and Dethatching If Needed
Step 5: Overseeding Thin or Bare Patches
Step 6: When and How to Start Watering Again
Step 7: Choosing the Right Spring Fertilizer
Step 8: First Mow of the Season—What You Need to Know
Common Mistakes to Avoid When Reviving Your Lawn
FAQs About Waking Up Your Lawn After Winter
Why Your Lawn Needs Special Care After Winter
Winter puts your lawn through months of stress—freezing temperatures, compacted snow, and a lack of sunlight can leave your grass weak, patchy, and slow to recover. But before you start raking, watering, or fertilizing, it is important to understand what your lawn actually needs in early spring.
Hidden Winter Damage That Slows Spring Recovery
Even if your grass looks fine at first glance, winter can cause underlying issues that affect its ability to grow back strong. Here are some of the most common post-winter problems:
- Compacted Soil – Snow and ice press down on the lawn, making it harder for roots to access air, water, and nutrients.
- Snow Mold and Fungal Growth – Prolonged snow cover can create matted, diseased patches of dead grass.
- Thatch Buildup – Dead grass and organic debris can block new growth and trap moisture, leading to mold or rot.
- Winter Desiccation – Cold, dry winds dehydrate grass blades, causing them to brown or die off.
- Rodent or Pest Damage – Burrowing animals like voles chew through grass roots, leaving behind dead patches.
When to Start Spring Lawn Care
Jumping into lawn care too soon can actually cause more harm than good. If the ground is still too cold or too wet, heavy raking, aeration, or mowing can stress the grass instead of helping it.
Best time to start:


Now, let’s take the first step—assessing your lawn’s condition to determine what it needs.
Step 1: Assessing Winter Damage
Before you start raking, watering, or fertilizing, take a close look at your lawn to see how it has fared through the winter. We’ll quickly assess any damage; this will help us prioritize the right recovery steps instead of wasting time on unnecessary tasks.
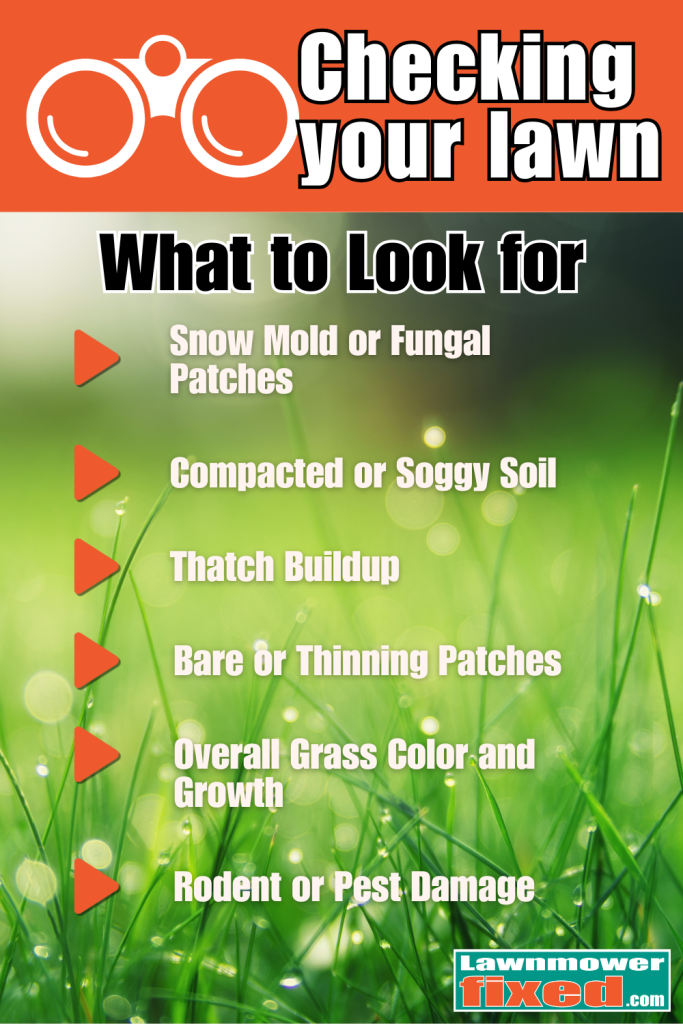

What to Look for When Checking Your Lawn
- Snow Mold or Fungal Patches
- Signs: Circular patches of matted, discolored grass, often gray or pink.
- What to Do: Gently rake out the affected areas to improve airflow and help them dry. In most cases, snow mold disappears on its own as temperatures rise.
- Compacted or Soggy Soil
- Signs: The ground feels hard and dense when stepped on, or puddles form after rain.
- What to Do: If the soil is compacted, aeration may be needed later in the season. If the lawn is still soggy, wait for it to dry before doing any heavy work.
- Thatch Buildup
- Signs: A thick, spongy layer of dead grass between the soil and living grass.
- What to Do: If the thatch layer is over ½ inch thick, dethatching may be necessary later.
- Bare or Thinning Patches
- Signs: Areas where grass is completely dead or thin compared to the rest of the lawn.
- What to Do: You may need to overseed these spots in early spring to encourage new growth.
- Rodent or Pest Damage
- Signs: Small, tunneled paths or chewed grass blades—often caused by voles or other burrowing animals.
- What to Do: Rake away damaged grass and monitor the area for regrowth. In severe cases, reseeding may be needed.
- Overall Grass Color and Growth
- Signs: If your lawn is still brown weeks into spring, it may be struggling to recover.
- What to Do: Check for green shoots at the base of the grass blades—if they are present, the lawn is likely just dormant and will bounce back with proper care.
Quick Lawn Assessment Checklist
Walk across your lawn—is the ground firm or soggy? Look for patchy, discolored, or moldy spots.


Check for thatch buildup by pressing into the grass.
Test for compacted soil with a screwdriver—if it is hard to push in, the soil is compacted.
Identify bare spots that may need reseeding.
Now that you know what condition your lawn is in, it is time for the first real action step—raking and clearing winter debris to help your grass breathe and prepare for healthy growth.
Step 2: Raking and Clearing Debris
Once you have assessed your lawn, the next step is to clear away the debris left behind by winter. Dead grass, leaves, and other organic matter can block sunlight and trap moisture, preventing your lawn from greening up properly.
Why Raking is Important
Raking does more than just tidy up your yard. It helps:
- Remove dead grass and thatch buildup, allowing new growth to emerge.
- Improve airflow and sunlight exposure, helping the soil dry out faster.
- Prevent mold and disease by eliminating damp, compacted patches.
How to Rake Your Lawn Without Damaging It
Grass is still fragile in early spring, so using the right raking technique is important to avoid damaging new growth.


Avoid raking if the lawn is still too wet, as this can pull up healthy grass and compact the soil further.
Use a lightweight fan rake instead of a heavy metal rake to prevent tearing up healthy grass.
Rake gently in different directions to lift matted areas and remove debris.
What Else Should Be Cleared from Your Lawn
Besides dead grass, other debris can smother your lawn and create problems if left unchecked.
- Twigs, branches, and leftover fall mulch can block sunlight and create cool, damp spots where mold can thrive.
- Rocks and gravel that may have been pushed onto your lawn from snow plows should be removed to prevent damage to mower blades.
- Pet waste left on the lawn all winter can create dead spots due to high nitrogen concentration.
What If Your Lawn is Still Soggy
If your yard is too wet from melting snow or early spring rain, hold off on raking until the ground dries out slightly. Raking on soggy soil can cause muddy patches and increase compaction, making it harder for grass to grow.
Step 3: Checking for Compacted Soil and Thatch
Now that your lawn is clear of debris, it is time to check the soil condition. Over winter, the ground can become compacted, and a layer of thatch may have built up, both of which can prevent water, air, and nutrients from reaching the roots.
How to Tell If Your Soil is Compacted
Compacted soil makes it difficult for roots to grow deep, leading to weak, thin grass. Here is how to check:
- Try pushing a screwdriver or garden stake into the soil. If it is difficult to push in, the soil is compacted.
- Walk across your lawn. If the ground feels hard and does not spring back, it may need aeration.
- Look for areas where water pools instead of soaking in. This is a sign that the soil is too dense.
What is Thatch and Why Does It Matter
Thatch is a layer of dead grass, roots, and organic matter that builds up between the soil and the living grass. A thin layer is normal and even beneficial, but too much prevents water and nutrients from reaching the soil.
How to check for thatch buildup:
- Push your fingers into the grass. If it feels spongy, you may have a thick thatch layer.
- Use a ruler or your fingers to measure the thickness. If the thatch is more than half an inch thick, it may need dethatching.
What to Do If Your Soil is Compacted or Has Too Much Thatch
If thatch is too thick, light raking can help break it up, but avoid heavy dethatching too early, as it can stress the lawn.
If the soil is compacted, aeration may be needed, but this is best done later in spring when grass is actively growing.
Step 4: Aerating and Dethatching If Needed
If your lawn has compacted soil or excessive thatch, it may struggle to absorb water, air, and nutrients. Aeration and dethatching can help, but timing is important—doing it too early in spring can stress the grass instead of helping it.
When to Aerate Your Lawn


Aeration is the process of punching small holes in the soil to loosen compaction and improve root growth.
Signs Your Lawn Needs Aeration:
- Water pools on the surface instead of soaking in.
- The ground feels hard and dense when walked on.
- Grass is thin and slow to green up, even with watering and fertilization.
Best Time to Aerate:
- Cool-season grasses (Kentucky Bluegrass, Ryegrass, Fescue) – Aerate in early spring or fall, when the grass is actively growing.
- Warm-season grasses (Bermuda, Zoysia, St. Augustine) – Wait until late spring or early summer when growth is strong.
How to Aerate:
- Use a core aerator (best for compacted soil) or spike aerator (for mild compaction).
- Run the aerator over the lawn in a grid pattern for even coverage.
- Leave the soil plugs on the lawn—they will break down naturally and improve soil health.
When to Dethatch Your Lawn
Dethatching removes the thick layer of dead grass and organic debris that prevents water and nutrients from reaching the soil.
Signs Your Lawn Needs Dethatching:
- Grass feels spongy when stepped on.
- Thatch layer is more than half an inch thick.
- Water and fertilizer struggle to reach the soil.
Best Time to Dethatch:
- Cool-season grasses – Dethatch in early spring or fall.
- Warm-season grasses – Wait until late spring or early summer.
How to Dethatch:
- Use a dethatching rake for small areas or a power dethatcher for larger lawns.
- Rake up the loosened thatch and dispose of it.
- Follow up with watering and fertilization to help the lawn recover.
What If Your Lawn Does Not Need Aeration or Dethatching?
If your lawn does not show signs of compaction or thick thatch, skip this step—unnecessary aeration or dethatching can stress the grass. Instead, focus on overseeding any bare patches to encourage thicker growth.
Step 5: Overseeding Thin or Bare Patches


After clearing debris and checking for soil issues, you may notice thin areas or bare patches where the grass did not survive the winter.
Overseeding is the best way to fill in these spots, helping your lawn grow thicker, greener, and more resistant to weeds.
When Should You Overseed Your Lawn?
Timing is important when overseeding. Seeding too early can result in poor germination, while waiting too long may allow weeds to take over.
- Cool-season grasses (Kentucky Bluegrass, Ryegrass, Fescue) – Best seeded in early to mid-spring when soil temperatures reach 50 to 65 degrees Fahrenheit.
- Warm-season grasses (Bermuda, Zoysia, St. Augustine) – Best seeded in late spring to early summer when temperatures stay consistently above 65 degrees Fahrenheit.
If temperatures are still too cold, hold off on overseeding until the conditions improve for better germination.
How to Overseed Bare or Thin Lawn Areas
Follow these steps to get the best results from overseeding:
- Loosen the soil – Use a rake to break up compacted areas and remove any dead grass. If the soil is hard, aerating first may help.
- Choose the right grass seed – Use a blend that matches your existing lawn for consistent growth and color.
- Spread the seed evenly – Apply the seed by hand for small patches or use a broadcast spreader for larger areas.
- Lightly rake the seed into the soil – This improves seed-to-soil contact, which helps with germination.
- Keep the soil consistently moist – Water lightly but frequently to keep the top inch of soil damp until the grass seedlings establish.
- Hold off on mowing – Wait until the new grass reaches three inches tall before cutting it for the first time.
What If Grass Does Not Grow in Certain Spots?
If grass struggles to grow in some areas, the problem could be:
- Too much shade – Consider using a shade-tolerant grass variety.
- Poor soil quality – Adding compost or topsoil can improve conditions.
- Heavy foot traffic – High-wear areas may need a more durable grass type or stepping stones to reduce damage.
By overseeding at the right time and caring for the new seedlings properly, your lawn will fill in evenly and grow stronger for the season ahead.
Next Step: When and How to Start Watering Again
Now that new grass is planted, let’s go over the right way to water your lawn in early spring to support new and existing growth.
Step 6: When and How to Start Watering Again
Watering is one of the most important steps in waking up your lawn after winter, but many homeowners either start too soon or water too much, leading to shallow roots and weak grass. The key to early spring watering is timing and technique.
When Should You Start Watering in Spring?


Your lawn does not need heavy watering immediately after winter. In most regions, early spring rains provide enough moisture for the grass to wake up naturally.
Start watering when:
- The soil begins to dry out and no longer feels damp.
- Grass looks wilted, pale, or slow to recover from footprints.
- You have overseeded and need to keep the soil moist for seed germination.
If the soil is still wet from snowmelt or spring rain, hold off on watering until it dries out to avoid over-saturation.
How Often Should You Water in Early Spring?
- If your lawn is already growing well, water once a week with about half an inch to an inch of water.
- If you have just overseeded, water lightly once or twice a day to keep the top layer of soil moist until new grass is established.
- If temperatures are still cool, reduce watering to prevent mold or fungus from developing.
Best Watering Techniques for Spring Growth
- Water deeply, but not too often – A good soaking encourages deep root growth, making your lawn more drought-resistant later in the season.
- Water in the morning – This allows excess moisture to evaporate during the day, preventing mold and fungal growth.
- Avoid evening watering – Watering at night can leave the lawn too damp for too long, increasing the risk of disease.
- Use a rain gauge or a can – Sprinkler systems can easily overwater, so place an empty can in the yard to measure how much water your lawn is actually getting.
What If You Have Heavy Clay Soil or Sandy Soil?
- Clay soil holds water longer, so reduce watering frequency to avoid water pooling.
- Sandy soil drains quickly, so you may need more frequent, shallow watering to keep moisture available.
What If Grass is Turning Yellow or Growing Slowly?
- If grass looks yellow or weak, it may need more watering or fertilization.
- If growth is uneven, check for compacted soil that could be preventing water from soaking in properly.
- If grass is growing too fast and looking thin, you may be watering too often—cut back slightly to encourage stronger roots.
Next Step: Choosing the Right Spring Fertilizer
Now that your lawn is getting the right amount of water, let’s go over how to fertilize properly to give your grass the nutrients it needs without overfeeding.
Step 7: Choosing the Right Spring Fertilizer
Fertilizing in early spring can give your lawn a strong start, but applying the wrong type at the wrong time can lead to weak growth, excessive thatch, or even lawn disease. Knowing when, how, and what to fertilize with makes all the difference.
When Should You Fertilize in Spring?
Timing is important—fertilizing too early can stimulate fast, weak growth before the roots are strong enough.
- Cool-season grasses (Kentucky Bluegrass, Ryegrass, Fescue) – If you fertilized in late fall, your lawn likely has enough stored nutrients to start growing in spring. If needed, apply a light fertilizer once grass is actively growing.
- Warm-season grasses (Bermuda, Zoysia, St. Augustine) – Wait until temperatures stay consistently above 60 degrees Fahrenheit, when these grasses come out of dormancy.
If your lawn is already growing well, avoid applying too much nitrogen early on, as it can cause excessive blade growth at the expense of root development.
What Type of Fertilizer Should You Use?


The best early spring fertilizers are slow-release and balanced, feeding the grass gradually without forcing excessive top growth.
Look for a fertilizer with an NPK ratio of around 10-10-10 or 15-5-10, which provides:
- Nitrogen (N) – Encourages leaf and blade growth but should not be too high early in the season.
- Phosphorus (P) – Helps with root development but is often already present in soil.
- Potassium (K) – Strengthens grass against disease and temperature swings.
Avoid high-nitrogen fertilizers in early spring unless your lawn looks weak or pale, as they can cause rapid, weak growth that burns easily under stress.
How to Apply Fertilizer Properly
- Apply when the grass is actively growing, not when it is still dormant.
- Use a broadcast spreader for even coverage.
- Water lightly after fertilizing to help nutrients absorb into the soil.
- Do not fertilize before heavy rain, as it can wash away nutrients before they are absorbed.
What If You Already Fertilized in Fall?
If your lawn was fertilized in late fall, it probably still has enough nutrients stored in the soil. Adding more in early spring could cause excessive top growth without strengthening the roots. In this case, wait until late spring or early summer before applying more fertilizer.
Fertilizing Mistakes to Avoid
- Applying too much nitrogen – This can lead to excessive, weak growth and increase thatch buildup.
- Skipping a soil test – Without testing, you may be adding nutrients your lawn does not need.
- Fertilizing too early – If the soil is too cold, the fertilizer will not be absorbed effectively, leading to waste.
Next Step: First Mow of the Season—What You Need to Know
Now that your lawn is properly fertilized, let’s go over how and when to mow for the first time in spring to encourage healthy growth.
Step 8: First Mow of the Season—What You Need to Know
Mowing too early or cutting the grass too short can stress your lawn and slow recovery after winter. The first mow of the season is about encouraging strong growth, not forcing it. Doing it right will set the tone for a thick, healthy lawn throughout spring and summer.
When Should You Mow for the First Time?
Do not rush to mow at the first sign of green. Cutting too soon can damage fragile new growth and leave the lawn vulnerable to weeds and disease.
Wait to mow until:
- Grass has reached at least three to four inches tall.
- Soil is dry enough to walk on without leaving footprints.
- The lawn has shown consistent new growth for at least a week.
For cool-season grasses, this usually happens in early to mid-spring. For warm-season grasses, wait until late spring when the lawn is actively growing.
How to Mow Without Damaging Your Lawn
- Set the mower height correctly – Keep the grass at three inches or higher to encourage deep root growth.
- Use a sharp mower blade – A dull blade tears the grass instead of cutting it, leading to stress and brown tips.
- Mow when the grass is dry – Wet grass clumps, creating an uneven cut and potential disease problems.
- Follow the one-third rule – Never cut more than one-third of the grass blade length at a time. Cutting too much at once shocks the lawn and weakens root development.
- Leave grass clippings on the lawn – If they are short, they return nutrients to the soil. If clippings are long, bag them to avoid smothering the grass.
Common Mistakes to Avoid with Early Spring Mowing
Mowing in the same direction every time – Switch up your mowing pattern to prevent soil compaction and uneven growth.
Scalping the lawn – Cutting too low weakens grass and allows weeds to invade.
Ignoring mower maintenance – Check your mower before the first cut to ensure the blade is sharp and the engine is running properly.
Common Mistakes to Avoid When Reviving Your Lawn
Even with the best intentions, many homeowners make common mistakes in early spring that can slow down grass recovery, weaken the lawn, or create problems later in the season. Avoiding these pitfalls will help you get a greener, healthier lawn faster.
1. Mowing Too Early or Too Short
Cutting the grass before it is actively growing can stress fragile roots and blades, making the lawn slow to recover.
Avoid this by:
- Waiting until the grass is at least three to four inches tall before mowing.
- Keeping the mower blade set to a high setting (three inches or more) to encourage deeper roots.
- Never cutting more than one-third of the grass blade height at a time.
2. Overwatering or Watering Too Soon
Many homeowners start watering in early spring before it is necessary, which can lead to shallow root growth and lawn disease.
Avoid this by:
- Checking the soil—if it still feels damp from winter moisture, hold off on watering.
- Watering only when the lawn shows signs of dryness, such as wilting blades or footprints remaining visible after walking on it.
- Using deep but infrequent watering to encourage strong root growth.
3. Fertilizing Too Early or Using the Wrong Type
Applying fertilizer before the grass is ready can force weak, rapid growth, leading to excessive thatch and potential disease.
Avoid this by:
- Waiting until the grass is actively growing before applying fertilizer.
- Using a balanced, slow-release fertilizer instead of high-nitrogen formulas that can cause excessive blade growth.
- Skipping fertilization in early spring if you fertilized in late fall, as nutrients may still be available in the soil.
4. Ignoring Thatch and Soil Compaction
A lawn that struggles to green up may be suffocating under thick thatch or compacted soil.
Avoid this by:
- Checking for thatch buildup and dethatching only if the layer is more than half an inch thick.
- Performing a screwdriver test—if it is hard to push a screwdriver into the soil, aeration may be needed.
- Aerating only when the grass is actively growing to prevent further stress.
5. Overseeding at the Wrong Time
Seeding too early, too late, or under the wrong conditions reduces germination rates and can lead to patchy growth.


Avoid this by:
- Overseeding only when soil temperatures are warm enough for seed germination—usually above 50 degrees Fahrenheit for cool-season grass and 65 degrees Fahrenheit for warm-season grass.
- Keeping newly seeded areas moist without overwatering.
- Choosing a grass seed blend that matches your existing lawn for a uniform look.
6. Skipping a Soil Test
Without testing the soil, it is impossible to know if your lawn actually needs fertilizer, lime, or other amendments.


Avoid this by:
- Testing soil at least once a year to check pH and nutrient levels.
- Applying lime only if the soil is too acidic, as adding lime unnecessarily can throw off the soil balance.
- Adjusting fertilization based on the soil test results instead of guessing.
7. Neglecting Early Weed Prevention
Waiting too long to tackle weeds can give them a head start, making them harder to control later.
Avoid this by:
- Applying a pre-emergent herbicide in early spring to stop weeds like crabgrass from germinating.
- Hand-pulling early weeds before they establish deep roots.
- Strengthening your lawn through proper mowing, watering, and fertilization to naturally choke out weeds.
8. Forgetting to Maintain Lawn Equipment
Dull mower blades tear the grass instead of cutting it cleanly, leading to brown tips and weakened growth.
Avoid this by:
- Cleaning the mower deck to prevent grass buildup and rust.
- Sharpening mower blades before the first cut of the season.
- Checking tire pressure, spark plugs, and oil levels in gas mowers.
FAQs About Waking Up Your Lawn After Winter
1. How do I know if my grass is dead or just dormant?
After winter, brown or weak-looking grass is not always dead—it may just be dormant. The best way to tell is with a simple tug test:
- If the grass pulls out easily with no resistance, it is dead and will need to be replaced.
- If the roots hold firmly in place, the grass is likely dormant and will green up as temperatures rise.
Also, check the crown of the grass blade (where it meets the soil). If it is white or light-colored, the grass is still alive and will recover.
2. Should I roll my lawn in early spring to flatten uneven spots?
Lawn rolling is not recommended in most cases. While it may seem like a good way to even out bumpy areas, rolling can compact the soil, making it harder for roots to grow and absorb water.
A better option is:
- Aerating the lawn to relieve compaction instead of increasing it.
- Filling low spots with a light layer of topsoil and reseeding as needed.
- Using a garden rake to gently level minor bumps before new growth starts.
3. Why is my lawn still brown weeks after the snow has melted?
Several factors could be delaying your lawn’s recovery:
- Soil temperature is still too cold – Grass will not green up until the soil warms above 50 degrees Fahrenheit.
- Compacted soil is preventing growth – If the ground is too hard, aeration may help.
- Snow mold or winter damage – Some areas may be slow to recover and need light raking or reseeding.
- Lack of nutrients – If the grass is pale yellow instead of deep green, it may need a balanced spring fertilizer.
4. How can I prevent my lawn from getting patchy after winter?
Patchy grass is often caused by uneven growing conditions. To keep your lawn uniform:
- Rake and aerate areas where growth is weak to improve soil conditions.
- Overseed thin areas with a matching grass seed blend.
- Mow at the correct height—cutting too short can weaken grass and cause patchy regrowth.
- Water evenly—some areas may dry out faster than others, so adjust watering accordingly.
5. Should I remove all the leaves and dead grass from my lawn in spring?
Yes, but do it carefully. Removing excess leaves and debris helps your lawn get sunlight and airflow, but some organic matter can actually benefit the soil.
Best approach:
- Use a light rake or leaf blower to remove heavy debris.
- Leave a small amount of mulched leaves or dead grass to decompose and enrich the soil.
- Avoid raking when the grass is too wet, as it can pull up healthy roots.
6. What is the best way to revive a lawn that was damaged by road salt?
Salt from roads and sidewalks can dry out the soil and kill grass, especially near driveways and curbs. To repair salt damage:
- Create a buffer zone by planting salt-resistant grasses or ground cover near sidewalks and driveways.
- Flush the soil with deep watering to help wash away excess salt.
- Apply gypsum—this helps neutralize salt buildup and restore soil health.
- Remove and replace dead patches with fresh topsoil and reseeding.
You may find the following links useful:


- About the Author
- Latest Posts


John Cunningham is a Red Seal Certified Tech with 25+ years of wrenching.
Bringing hands-on expertise to LawnmowerFixed.com, John writes practical repair and lawn care guides with a passion for keeping outdoor equipment running smoothly.